Looking for a Great Desert walkthrough in Stellar Blade? This page will demonstrate how to discover every collectible and resource in the colossal area, which represents another sandbox-style location like the Wasteland in Shift Up's console debut. As part of our Stellar Blade guide, our Great Desert walkthrough will detail the locations of Cans, Design Patterns, Beta Cores, Body Cores, Exospines, Passcodes, Camps, and more.
Subscribe to Push Square on YouTube168k
Where Are All Collectibles and Resources in the Great Desert in Stellar Blade?
Below you'll find a full Great Desert walkthrough, which details the locations of all key collectibles and resources in the Stellar Blade stage.
Great Desert
Camp: All Camps
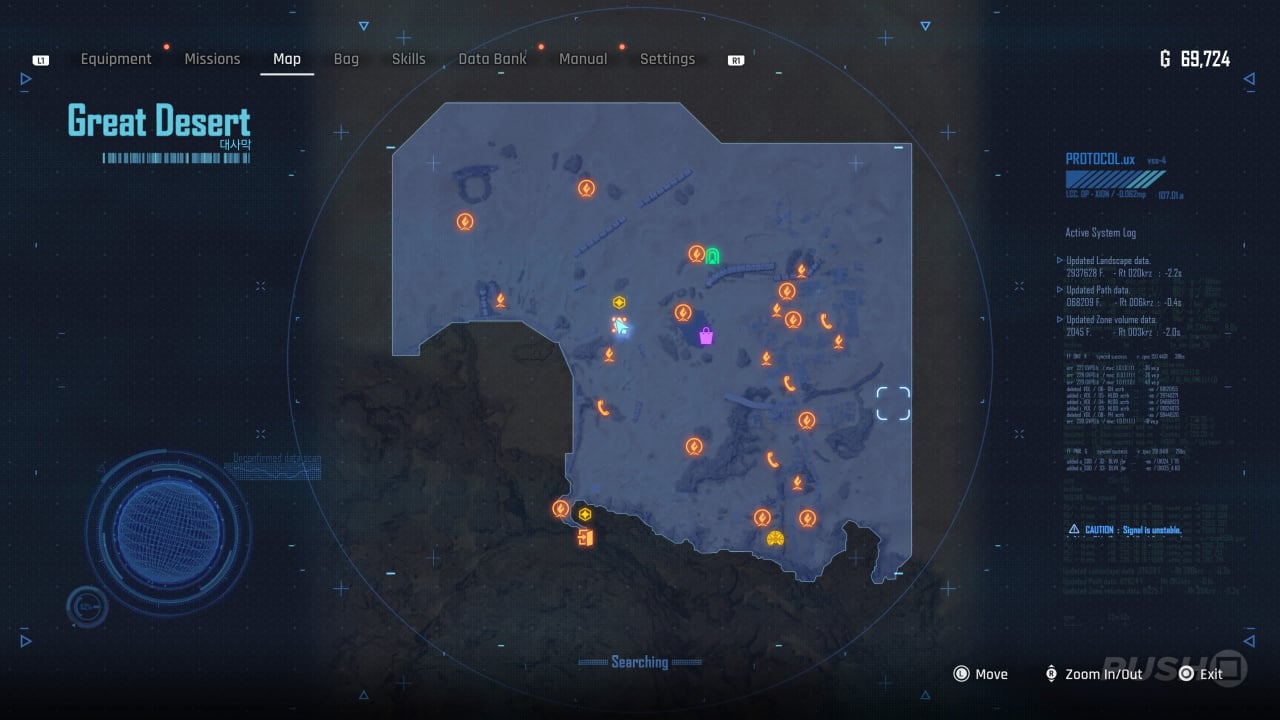
This screenshot reveals the location of all Camps in the Great Desert. In total, there 19 Camps in the Great Desert.
Can: Nectar Grape
In the centre of the map, right next to the Great Oasis, near to the waypoint for the CnL - Communicate and Link quest, there's a Fiz vending machine next to a signal pole. Interact with it to get the Nectar Grape can.
Can: Newfoundland Dry Zero
Towards the south-west of the Great Desert, right at the bottom of the map, there's a crate partially exposed among some reeds. Shoot it to find the Newfoundland Dry Zero can.
Body Core #1
The Central Great Desert Camp can be accessed by moving a yellow box and climbing atop it to reach the upstairs of a collapsed building. From here, use the yellow handholds on the building opposite to reach the upstairs room. Inside you'll find a glowing body, which you can scan for a Body Core.
Passcode: Solar Tower Area
While looking for the Service Drones as part of the mission Reboot!!, you'll discover the Passcode by destroying a Robot behind some boxes in the southern part of the Great Desert.
Beta Core #1
Just north-east of the Solar Tower, on the Collapsed Overpass, there's a Beta Core at the very end of the road. This is quite tricky to reach. You'll need to climb up the second road, which is the one further away from the Solar Tower and head to the very south of the map, then enter a tunnel at the extreme bottom of the map and come back around on the different road. At the very end, before you slide down to ground level, there's a glowing corpse slumped against a car. Interact with it for the Beta Core. If you need additional direction, then you can follow the quest Fallen Angel, which will direct you to the tunnel at the bottom of the map.
Exospine: Recovery-Type Exospine
Near to the Abandoned Overpass, on a protruding metal passageway, you'll find the Recovery-Type Exospine in a red box.
Passcode: Teddy's Locker
At the back of the area with the Solar Tower, scan the human corpse for the Passcode.
Body Core #2
There's a collapsed building east of the Debris-filled Entryway with a Body Core inside.
Design Pattern: Black Wave
Near the Debris-filled Entryway, where you find the above Body Core, if you head to the rear of this area with collapsed buildings you'll find a moveable yellow platform. You can use this to reach some yellow handholds and monkey bars. Progress through this area killing the Robot along the way, and then look to your left. Jump onto the rooftop and open the red box for the Black Wave blueprint.
Can: Johnson's Highball Lemon
In the cave which is east of the Debris-filled Entryway, be careful of the quicksand in this area. Take the long way around to the entrance, and defeat the Lurkers. Then move the yellow box to climb and find the cool box, which has the Johnson's Highball Lemon can inside.
Can: Starwell
Near to the West of Buried Ruins, you should spot a flashing on the ground near to a Lurker. You need to drop a Smart Mine to trigger an explosion here, which will reveal both the Lurker and a cool box. The Starwell can is inside the cool box.
Beta Core #2
Travel directly south from North of Buried Ruins, and look inside a collapsed building for a corpse. Interact with it for the Beta Core.
Can: Liquid Nuclear
There's a building just west of Middle Path Between Ruins. You can get inside by climbing up the steel scaffolding. Inside you'll find a yellow box which can be dragged around the room to a ledge at the far corner. Climb up and drop into the courtyard, where you'll be ambushed by Naytibas. Clear them out and then open the cool box for the Liquid Nuclear can.
Can: Behemoth Black
In the parking lot, which is north of Middle Path Between Ruins, you need to move the yellow boxes onto the pressure pads in the spaces 2, 12, and 13. This will cause the Behemoth Black can to pop out of the cool box, and you'll be able to collect it.
Can: The Haven Milk Tea
In the area west of the parking lot, there are a bunch of pressure pads and trolleys you can pull around. You need to create the code 467 by pushing trolleys onto different pressure pads. The puzzle's not especially difficult and can be solved with a little bit of trial and error. If you need more trolleys, you can find them by blowing up some explosive barrels on the bottom floor of a couple of buildings. Once you've got the code, interact with the keypad to open a gate. You'll find a cool box with The Haven Milk Tea can inside.
Body Core #3
Head to the eastern-most part of the map, beyond the parking lot. You'll find a corpse slumped against some collapsed debris. Interact with it for the Body Core.
Can: Cryo the Malt
In the area just north of West of Buried Ruins, you'll need to shoot a target hovering overhead in order to release a rope. Once you climb up, you'll see a fuse panel you can interact with. You now need to complete a platforming sequence within 30 seconds to switch on two more fuse panels. Get them all in time and the generator will light green, indicating you can open the gate below. Slide down the ladder, interact with the cool box, and collect the Cryo the Malt can.
Can: Nectar Cranberry
On the far eastern side of the map, behind the phone box fast travel point, there's a ledge which goes up and down you can grab on to. Use this to reach the service robots, and a ledge with a cool box. Open the cool box for the Nectar Cranberry can.
Passcode: Oasis
From the location of the Nectar Cranberry can, jump across a couple more service robots and use the rope to reach another ledge just off to the left. Open the gate and drop down the ladder to find a corpse. Interact with the body for the Passcode.
Design Pattern: Cybernetic Bondage
Using the Passcode you just got, dive into the water near to the Supply Camp and open the box. You'll get the Cybernetic Bondage blueprint.
Can: Potential Frost
When following the mission An Eye for an Eye, a Tooth for a Tooth, you'll need to climb to the top of some skyscrapers and position a moveable yellow crate underneath a seesaw in order to reach a monkey bar to swing to the next rooftop. Just before you wall run to the next area, you'll see a room protected by two lasers with a crate inside. Jump dash between the lasers and open the crate. The Potential Frost can is inside.
Can: Johnson's Highball Ginger
After completing the An Eye for an Eye, a Tooth for a Tooth quest, you'll reach a Supply Camp named Crumbling Rooftop. Climb down the ladder and drop onto the bus, then deal with the Naytiba in the area you've reached. Near the wall on the south side is a Fiz vending machine with the Johnson's Highball Ginger can inside.
Can: Milky Pop Zero
As you move towards the western side of the map, there's a large rock structure you can climb up from the western-most side. You'll see two monkey bars you can swing on from the upper-ledge, but in order to reach the top you'll need to shoot a dart board in order to release a hanging rope first. Use this rope to reach the top and you'll find the Milky Pop Zero can in a cool box.
Beta Core #3
Immediately after collecting the Milky Pop Zero can, carefully drop down on the eastern side of the rock you're currently standing on. Use your scanner to see the location of a human body if you need to. You should find a corpse slumped against the wall. Interact with it for another Beta Core.
Passcode: Buried Ruins
In the Opera House, towards the eastern side of the map, destroy the robot near to the piano on the stage to get the Passcode. You'll likely find this as part of the Madama Machine quest.
Can: Mountain Sparkle Everest
Just to the east of the Opera House, there's an area with a room blocked by multiple lasers. You need to push a nearby yellow block from one side of the area to the other in order to block the lasers. Be careful, because you will be attacked by Naytiba while doing this. Once you've blocked the lasers, you'll be able to enter the room and open the cool box, which has the Mountain Sparkle Everest can inside.
Special Reward: Blue Monsoon
During the quest Precious Treasure, obtained from the Bulletin Board, you'll need to open a red box atop a collapsed highway. To get up here, you need to destroy a red barrel just behind the yellow bus, causing the bus to move and create a makeshift bridge to your Special Reward.
Design Pattern: Daily Sailor
In the northern part of the Great Desert, you'll stumble upon some ruins with a moveable yellow trolley inside. Blow up the red barrel preventing you from moving it, and then drag it in position so you can reach the hand hold at the back of the building. Use your scanner if you're not sure how to get up here. Climb around the outside of the building to reach the top, and then use the monkey bars to swing across to the other side. There's a red crate here, with the Daily Sailor design blueprint inside.
Passcode: Destroyed Hypertube
Just north of the Buried Ruins Outskirt, there's a passageway with a robot wandering around. Kill it for the Passcode. Then look for the ropes dangling above the Supply Camp. There's a target you can shoot here, revealing a third rope. Swing between them and go up. Drop down into the next room and open the box using the Passcode.
Can: Liquid Fire
On the roof of the building here, there's a cool box with the Liquid Fire can inside. As soon as you try to open it, however, you'll be attacked by a bunch of explosive drones. Destroy them all and the collectible will pop out.
Can: The Haven Earl Grey
Run the length of the Hypertube, east of Abyss Levoire, and you'll find a cool box with The Haven Earl Grey on it at the far end.
Can: Cryo Café Mocha
In the north-western expanses of the Great Desert, you'll find a cool box on a wooden platform. Open it and three targets will appear. Shoot them down, and you'll be rewarded with the Cryo Café Mocha can.
Exospine: Suppression-Type Exospine
There a ton of Naytibas defending this metal platform, not far from the Hypertube. Defeat them all, and then open the red box for the Suppression-Type Exospine.
Design Pattern: Ocean Maid
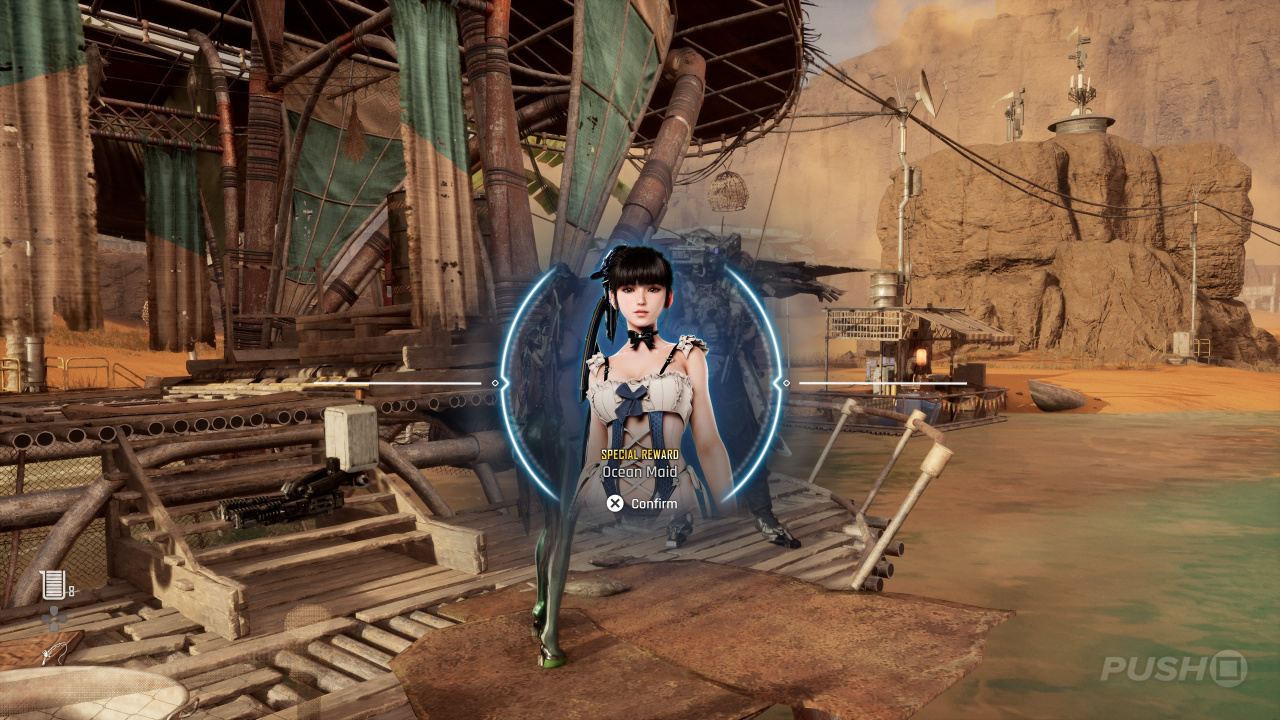
Once you've caught all the fish, talk to Clyde at the Great Oasis. He'll reward you with the Ocean Maid outfit. For more information, refer to All Fish Locations and How to Catch Them.
Did you find this Great Desert walkthrough in Stellar Blade helpful? Take a look at our Stellar Blade guide, and let us know in the comments section below.


Comments 0
Wow, no comments yet... why not be the first?
Leave A Comment
Hold on there, you need to login to post a comment...