Looking for a The Quest for Tyr walkthrough for God of War Ragnarok? The Quest for Tyr is the second quest in The Path, which represents Ragnarok's main storyline. As part of our God of War Ragnarok guide, we're going to share our full The Quest for Tyr walkthrough, which includes puzzle solutions, combat strategies, and any other key areas of interest.
God of War Ragnarok: The Quest for Tyr Walkthrough
After Surviving Fimbulwinter, it's time to begin The Quest for Tyr. You'll begin in the Aurvangar Wetlands in Svartalfheim, with one of Odin's Ravens directly to your left. Atreus will spy a boat and immediately begin trying to break it free, but beware, because you'll be ambushed by Wretches soon after. Grab the boat and push it into the water, then set sail. There are resources, like Rawhide, that you'll find in the water along the way. You can also find Hacksilver by breaking open floating barrels.
Eventually you'll sail to a wheel that's blocking the pathway, so dock at the nearby beach on the right, marked by a white flag. There's a geyser blocking the path, but you can freeze it by throwing your axe at the bottom of the water stream. To the right is a Nornir Chest and an Artefact. You need to freeze the geyser to discover a pathway above the Nornir Chest. There's an Idunn Apple inside. Return back to the main path and climb up the wooden structure.
Abseil down to lower land, and you'll be ambushed by Grims. If you climb up the platform on the far end, opposite where you entered the area, there's a red chest with Hacksilver and Rawhide inside. Once you're done, climb the metal chain to reach the wheel that blocked your path previously. Opposite the wheel is a chest with Hacksilver inside. Once you've done that, use the Blades of Chaos to turn the wheel and return to your boat.
Sail underneath the bridge and disembark on the beach on the right. There are a number of brambles you can burn with the Blades of Chaos here, so set fire to all of them to reach an upper-area with a red chest that contains Hacksilver and Rawhide. Once you're done, head forward to the next beach, and deal with the Grims and Wretches who ambush you. There's a capped geyser on the left that you can open up, but the water doesn't flow high enough to turn the wheel, so climb up the wall ahead and deal with more enemies. You can freeze the geyser you uncapped with the Leviathan Axe to uncap another geyser higher up. Then freeze this one as well to get the wheel turning and open up a new path for the boat. Hop inside and continue on your way.
Continue onwards in your boat until you reach a locked gate. You can disembark to the right. Here you'll find a strange creature that keeps popping in and out of the sand. You can't kill it without flanking it, so navigate the wooden platforms behind it. This is an Ormr, which is carrying all kinds of valuable resources you should ensure to collect.
Now throw your axe at the metal plate holding up the anchor, so that you can progress forward and pull the chain half opening the aforementioned gate. You'll need to find another chain. Jump across the gap to the left and freeze the geyser. Cursed Grims will ambush you in this area, so use your Leviathan Axe to knock them off the walls and dispatch them. There's another capped geyser just around the corner so open it up and then head back to the previous geyser under the platform. This will begin turning the wheel and bring down the big anvil-shaped block. Once it's come all the way down, throw your Leviathan Axe at the plate on the chain to drop the block.
Now climb up on the block and freeze the geyser opposite to raise yourself up. There's an Artefact and red chest up here. Finally, pull the chain and open up previously locked gate. Then return to your boat and continue onwards.
As you approach the city, an alarm will sound. Follow the water to its natural endpoint and disembark to reach Nidavellir. Follow the path forwards, beyond the statue of Odin, and you'll spot one of Odin's Ravens on a nearby rooftop, just next to Sindri. Before you speak to him, open the blue chest to his right for a Shattered Rune, and various other resources. Sindri will subsequently upgrade Atreus' arrow, and instruct him to fire at a nearby gate. Be prepared before following this instruction, because you'll immediately be ambushed. Deal with the enemies and then you can spend a moment upgrading your equipment if you want to. Once you're done, climb through the gate you just opened.
Immediately to the left there is a cart that Atreus can shoot with a Sonic Arrow, opening up a new path. Follow it forwards, and shift a second cart out of the way by pushing it. Follow the path to a door at the end of the road where music is playing, and head inside. Speak to Raeb who's playing a musical instrument, he'll send you out the back door. If you speak to Raeb a second time, you can pick up a Favour named In Service of Asgard. Continue out through the back door and Sindri will speak with you once more, awarding you with a compass. Just up the road, in the dwarven house on the left, is some Hacksilver, so grab that if you want to.
Follow the path as far as you can go until you reach a boat. Hop inside and begin sailing once more. You can complete In Service of Asgard now if you want to, or alternatively head left to continue The Quest for Tyr. Dock outside Durlin's house and head through the front door, beneath the dilapidated sign. This will trigger a cutscene, introducing you to Durlin.
Exit through the back door, opposite to the one you entered through, out into the dock. There are a ton of Grims and Cursed Grims in this area, so be sure to deal with them first. Remember to open the red chest for Hacksilver and Rawhide before moving on through the gate opposite Durlin's office. Before you get aboard the train, open the red chest to the right of the track to get Forged Iron and other resources.
Once you're done, climb aboard the train and get moving. You'll come out at The Forge, and there's one of Odin's Ravens flying above the walkway you follow Atreus across. Break down a bunch of wooden panels at the end of the track for an Artefact. You'll also find a Nornir Chest in this area, but you'll need additional equipment to open it. Instead, crawl through the small marked gap, and get ready.
Boss Fight: How to Beat Dreki
Uh-oh, it's time for the first boss fight in quite a while. The Dreki is extremely nimble, and will attack you with both its colossal jaws and razor-sharp tail. You can deflect its pounces with your shield if you time it right, allowing you to stun the lizard-like foe and dish out some serious damage. Be careful for its spit attacks, though.
As the fight progresses, the Dreki will begin to summon electrical currents. These stun-lock Kratos if he's caught in them, so be sure to dodge roll out of the way when the foe charges up — and when it spits on the ground. After you've issued enough damage, you'll be able to finish the foe off with R3. Control will temporarily switch to Atreus while he uses his bow, so take the shot and bring the beast down. Remember to loot its corpse for a new Light Runic Attack named Flames of Anguish.
Once you're done looting, squeeze through the gap to continue onwards. There's two directions you can go here. Head to the right for Lore in the form of a Rune Reads named The Forge and a Scroll called Dear Overseer. There's also a locked gate here. Head back and take the other path, to the left of the gap you squeezed through, towards the train track. There are resources in a red chest, which you'll need to use the Blades of Chaos to access. Near to the train are a seemingly never-ending string of Wretches. You need to destroy the nest to stop them from continuously attacking you. Then you can move on to the broken train. Cut off its trailer and lift it onto the tracks. Follow Atreus' instructions to put it in place, then climb aboard.
Unfortunately, the journey is anything but smooth, and you're going to have to fend off a bunch of foes in QTEs along the way. And then, even once you get off the train, there are more Grims waiting for you. There's a chest on the bottom platform with Hacksilver inside, and then off to the right is a bridge, which you can access by instructing Atreus to fire a Sonic Arrow at the green blockage in your way. Detonate the gas cannister to open up a doorway into a dwarven building.
You'll exit at the Jarnsmida Pitmines. Drop down and throw your axe at the big water pipe to freeze it. This creates an opening for you to jump to the other side. There's a Nornir Chest here, and red chest off to the left. You'll also find Lore in the form of a Rune Read named The Pit-Mine nearby. To light the final brazier, you need to once again freeze the water supply overhead first. Continue to the right, and boost Atreus up the ledge. Instruct Atreus to turn the wheel, then freeze the gear to leap across. To the right is a pulley you can move with the Blades of Chaos, allowing you to continue forward. There's one of Odin's Ravens in this area, to your left.
Freeze the water flow to bring the big rock platform down, and then jump towards it. Once you're on top, recall your axe to get lifted up to the next level. Help Atreus open the gate. Shove aside the cart and rendezvous with Sindri. Of course, after he's done giving you a torch, you will be immediately ambushed, including by a new enemy type: a Draugr. There are some chests around here, so open them up if you want to, then head inside the mine. Beware, there's Wretches inside here, just before the cave on the left that you need to enter through.
Instruct Atreus to fire a Sonic Arrow to open up the pathway ahead, then crawl through the gap. On the other side is a Bergsra Mother, who you'll need to defeat to stop the Wretches from constantly respawning. Behind where the Bergsra Mother was is a boat, so ride it deeper into the mine.
You'll get off at The Applecore. There's a blue chest with Beast Scraps, as well as one of Brok and Sindri's Shops. Be sure to spend a little time upgrading your gear here. At the end of the path is a gate you can instruct Atreus to shoot a Sonic Arrow at for some Lore in the form of a Rune Read on the other side. The water flow is blocked opposite, so get Atreus to fire another Sonic Arrow to clear out the debris and get it moving again. Once it's flowing properly, throw your axe to freeze it, revealing a hookshot point for you to navigate forwards. Open the big doorway and follow Atreus inside. There's a red chest and another doorway that Atreus can fire a Sonic Arrow at. Squeeze through the gap to continue deeper into the mine. Progress forward but beware the Draugrs on the other side. On the right you'll find Lore in the form of a Lore Marker named Cooperation.
Follow the tracks upwards until you reach a big dangling chain. Use your Leviathan Axe to freeze the water and raise the hookshot point. Cross to the other side and pull the tab on the left to keep the water flowing when you've reclaimed your axe. Then follow the path to your left, beyond the red chest, up the metal rope. There's another tab here you can pull, powering up the elevator. Before you can get into the elevator, freeze the water flow on your right so that it drops down. Then climb inside and reclaim your axe to get moving. Once you get out, there's a yellow chest on the left with Hacksilver inside, so be sure to grab that, then go through the door. There are Wretches in here, and a Relic is being clutched by a dead body trapped in the wall. Upon collecting the Relic, be careful, because a bunch of Cursed Grims will ambush you. Take them out.
Squeeze through the gap where you collected the Relic. Follow the tracks up on the left, and shoot the brazier with a Sonic Arrow to discover a hookshot point. Swing across and follow the pathway around. There's an Artefact near to the big wooden doors. Once you go through, prepare yourself.
Boss Fight: How to Beat The Hateful
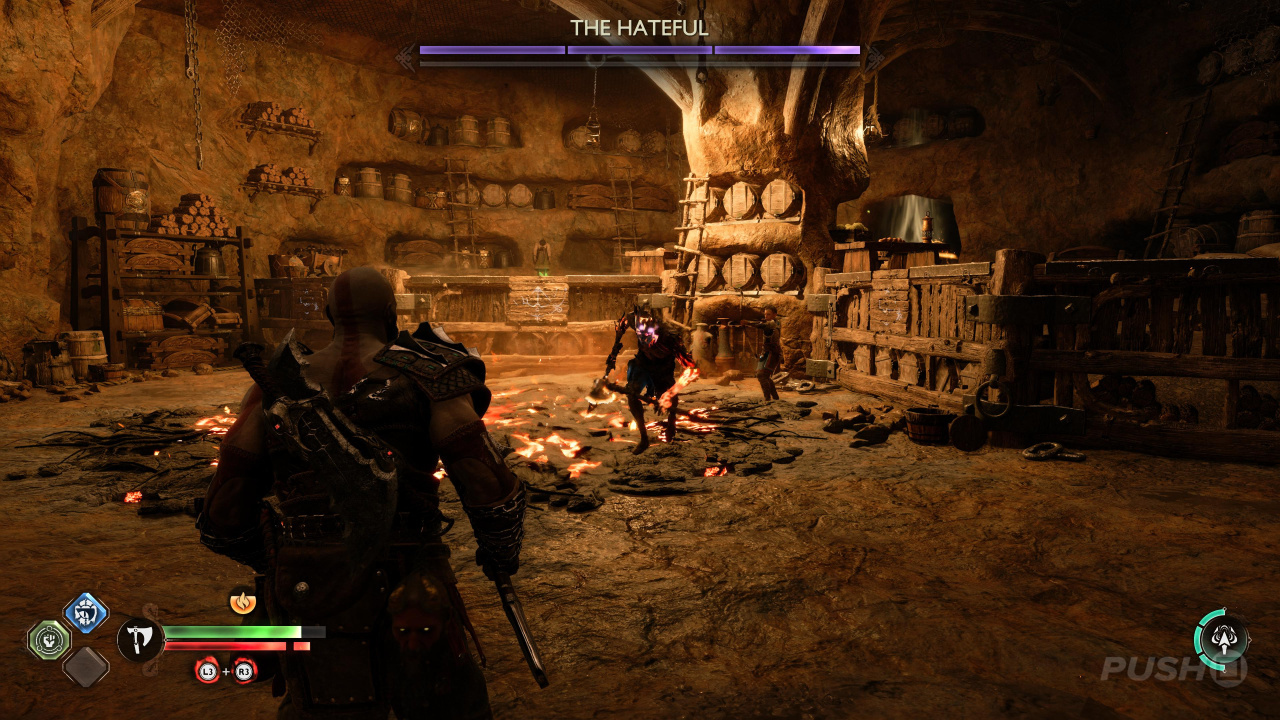
On the other side of the door, you'll face off against a supercharged Draugr known as The Hateful. This beast will try to throw fireballs at you, but you can pretty easily repel these with a well-timed shield block. Naturally, this stuns the foe and opens him up to a combo, but he'll try to strike you once more. Again, you can deflect this attack, stunning him even longer and issuing maximum damage. Rinse and repeat this strategy to defeat the beast, unlocking a new Favour called Born from Fire. Remember to loot his corpse for Sovereign Coals and Dust of Realms, as well as the Cursed Empress Handles. There's also a yellow chest in the back of this room with the Fortified Frost Knob inside.
Head back outside and backtrack until you come to a metal chain that can be pulled. Irritatingly it's blocked, but there's a pile of debris just below that Atreus can fire a Sonic Arrow at to clear. Pull the chain and slide down the rope. Boost Atreus up to higher ground at the rear of the room. Freeze the water flow next to the wheel, and then instruct Atreus to turn the crank. This will create a blockage, allowing you to reclaim your axe while the wheel continues turning.
You can now use your Leviathan Axe to freeze the other water tunnel, raising the hookshot point and allowing you to jump to higher ground. Once you're on the platform, instruct Atreus to fire a Sonic Arrow at the debris from earlier, and you'll be transported across to the other side. Note, as you walk to the door, one of Odin's Ravens is peeping out of the wall. If you shimmy across, there's also a yellow chest nearby. Once you're done with all that, head through the final door. There's a red chest with Hacksilver and Slag Deposits on the other side. Crawl through the gap in the wall.
There's a big locked door ahead. Instruct Atreus to fire Sonic Arrows at the four clasps, and head inside. You'll be immediately interrupted by Einherjar, so brace yourself for battle. Once you're done with your new-found friends, pull the door down. It's finally time to find out who — or, indeed, what — is inside. Watch the cutscene unfold.
Annoyingly, he'll run away, and you'll be once again ambushed by more Einherjar. Dispose of them, and then take up chase. You'll encounter more enemies along the way, so dispatch them as quickly as you possibly can. You will encounter a much stronger Einherjar Brute, so be careful and make sure you're using all of the abilities in your combat toolset. Remember, if you get hit by Bifrost it will detonate the next time you take damage, so just be careful and ensure you're both dodge rolling and deflecting enemy attacks. This section is relatively linear, so just keep moving forward until you find Atreus and Tyr. Watch the cutscene for some major revelations.
Follow Tyr and Atreus onto the elevator and interact with the switch to begin your ascent out of the mine. You'll exit at the Sverd Sands, and there's a yellow chest directly opposite. You'll briefly be ambushed by Cursed Grims, so deal with those, then continue forward. Climb aboard the raft, and watch the cutscene with Tyr.
Initially, you'll pull the raft with the L2 and R2 buttons, but as the action intensifies, you'll need to mash the circle button. Once you reach land, you'll have to fight one more Einherjar, then you can enter the gateway. This will complete The Quest for Tyr. Once you're back at Sindri's House, speak with Atreus outside and then head through the door. You can visit the Huldra Brothers' workshop at this point to upgrade your gear and equipment. Once you're done, consult with Mimir privately in the back room.
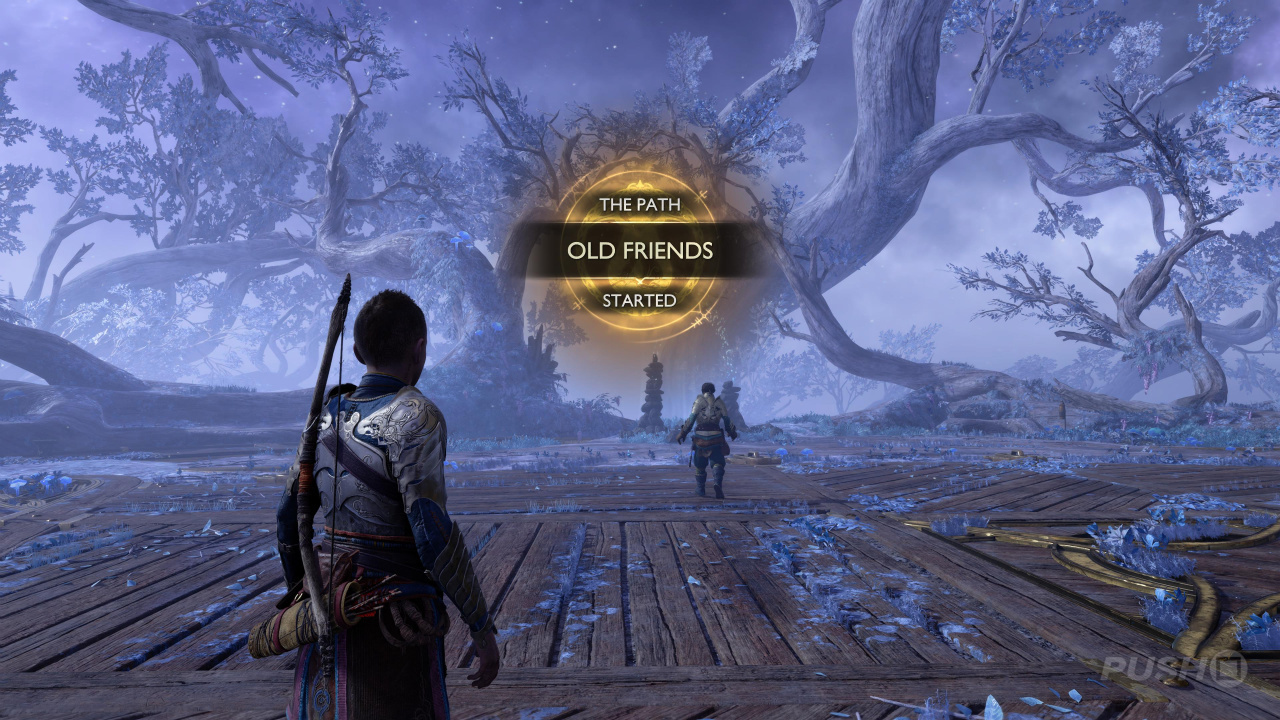
Oh, this is different, now you're in control of Atreus! Sneak outside of the house to the Mystic Gateway with Sindri to begin Old Friends.
God of War Ragnarok: The Quest for Tyr Objectives
- Journey to Nidavellir
- Explore Nidavellir
- Boat to Durlin's office
- Exit Durlin's office to the port
- Reach the mine beyond the mountain
- Reach the front of the broken train
- Fix the broken train
- Ride the train to the mines
- Search the mines for Tyr
- Pursue Tyr
- Exit the mines with Tyr
- Escape through the Mystic Gateway
God of War Ragnarok: The Quest for Tyr Rewards
- Kratos
- 750 XP
- Atreus
- 375 XP
Did you find our The Quest for Tyr walkthrough for God of War Ragnarok useful? Refer to our God of War Ragnarok guide for more information, and let us know in the comments section below.


Comments 0
Wow, no comments yet... why not be the first?
Leave A Comment
Hold on there, you need to login to post a comment...