What are all Windmill locations in Dying Light 2? Acting as a safe space after activation, Windmills offer somewhere to spend the night and escape the undead horde, as well as access to the Player's Stash and traders. In this Dying Light 2 guide, we're going to reveal all Windmill locations. Activating all of them unlocks the Don Quixote Trophy.
If you need help finding any of the other activities on the map, please use the following guides: Dying Light 2: All Metro Station Locations, Dying Light 2: All Bandit Camp Locations, Dying Light 2: All Airdrop Locations, Dying Light 2: All GRE Anomaly Locations, Dying Light 2: All Facility Locations, and Dying Light 2: All Nightrunner Trial Locations.
Dying Light 2: All Windmill Locations
There are 17 Windmills to find in Dying Light 2. These structures are dotted throughout the game, and offer simple parkour challenges. You must make it to the top of them and interact with the fuse box in order to complete the objective, at which point you'll unlock a safe house and the faction that owns the territory moves in to rebuild. You'll be given UV light for safety during the night, and a bed to sleep on if you want to fast forward time. They are labelled on the map as windmills.
Below you'll find all Windmill locations in the game. We have broken them down into individual districts and provided a brief explanation of the sort of parkour challenge you'll encounter once you get there.
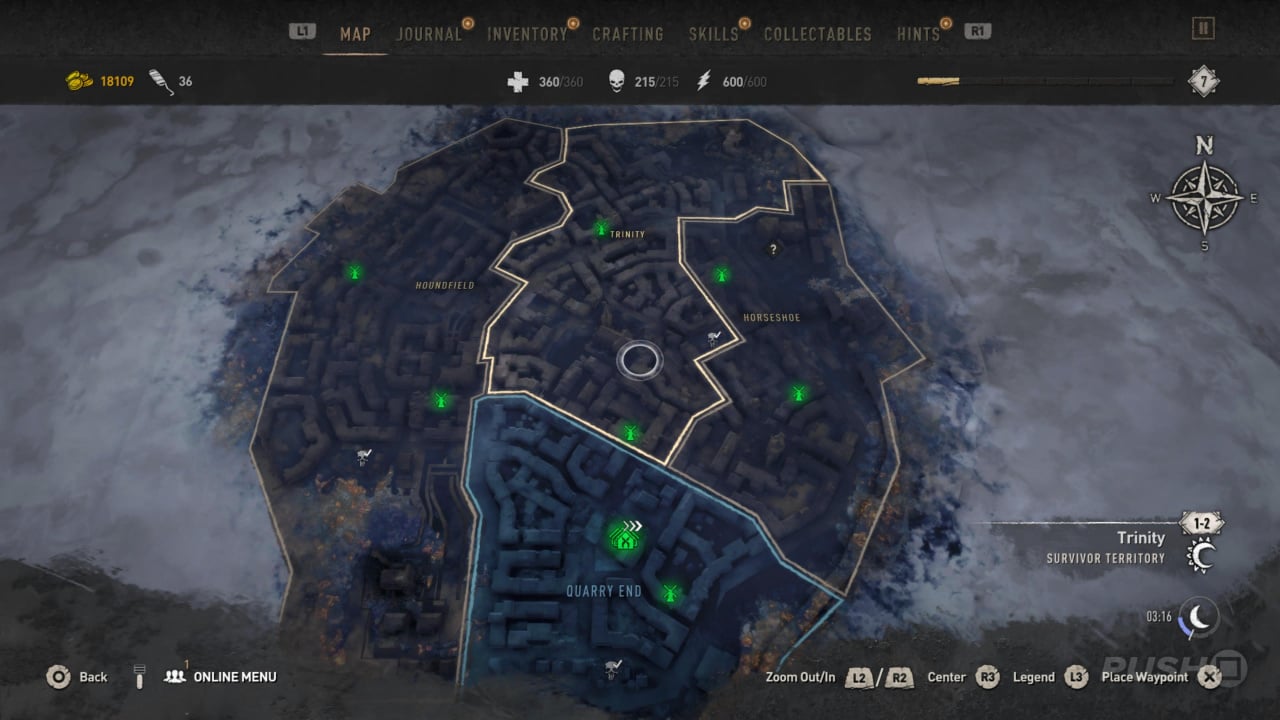
Houndfield
- Birch Windmill — Use the two moving counterweights to climb the structure, then jump to your right where the yellow ledge is. Jump across to the other side of the Windmill, then climb the ladder to get to the top.
- Cherry Windmill — The wooden side of the Windmill and the moving counterweight will get you a good chunk of the way up this Windmill. Once you can go no further, look to the right and climb through the gap in the wood. Then jump up to your right, cross the wooden path, and take the ladder up to the top.
Trinity
- Alder Windmill — Use the jump pad to leap across to the large weight moving up and down. Then jump across back over to the other side once the weight is at the top, take the path to the right, and climb the ladder to the Windmill's peak.
- Larch Windmill — Use the two counterweights to reach the summit. Once you're as high as they'll take you, head through the gap on your right and up the ladder to the top.
Horseshoe
- Willow Windmill — Climb up the chimney at the base of the Windmill and jump onto the counterweight. As you're heading up, jump to the right when possible to climb onto the much larger weight moving up and down. Then head to the right and climb up to the top of the structure.
- Maple Windmill — Climb up onto the big generator and take the path across and up the ladder. Then jump onto the weight when you can, follow the path around and up the ladder. Then you'll be at the top.
Quarry End
- Oak Windmill — This Windmill is built on top of a base run by the Peacekeepers. Simply use the scaffolding and ladders provided to reach the top.
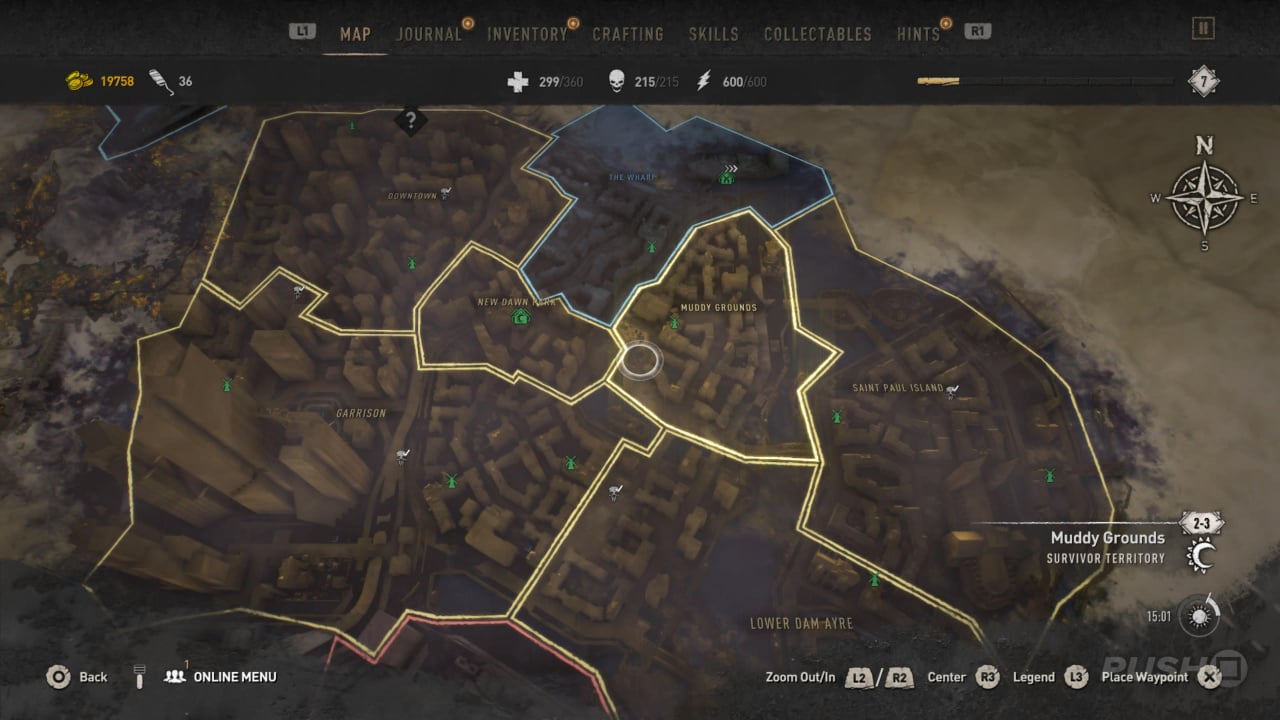
Downtown
- Walnut Windmill — Use the vertically moving yellow bar to work your way between platforms up the Windmill. Then take the ladder up to the top once you can go no higher.
- Pine Windmill — Jump up to the vertically moving yellow bar and shimmy across until you're on the left-most side. Then jump onto the wooden platform. Do so once again to reach the floor above you and then take the ladder up to the top.
The Wharf
- Magnolia Windmill — This is another Windmill built into a Peacekeepers base. Simply use the ladders to make it to the top.
Muddy Grounds
- Elm Windmill — Use the Paraglider and take advantage of the nearby air vents to reach the top of this Windmill. You can't manually climb to the top on your own.
Saint Paul Island
- Ash Windmill — Jump onto the counterweight and take it up until you can climb through a gap in the wood on the left. Jump across to the larger weight and up the ladder you go to activate this Windmill.
- Cedar Windmill — At the base of the Windmill, use the fuse box and turn it on. This will activate the large weight in front of you, revealing something to climb when it moves upwards. Jump across and then step onto the weight. At the top of its climb, there are three yellow bars. Swing between these until you're able to jump to the ladder and head to the top.
Lower Dam Ayre
- Spruce Windmill — Use the generator at the base of the Windmill to grab onto the moving weight. Then use the Grappling Hook to swing between the two sides of the structure and grab the moving weight that's even higher up. Once you've grabbed onto it, turn around and jump across to the platform. Then head up the ladder to the top.
Garrison
- Hickory Windmill — Use the two moving yellow bars to work your way up to the first platform on the Windmill. Then look right and head up to the second platform. Cross the gap and climb the ladder up to the top.
- Juniper Windmill — Climb to the top of the VNC Tower using the elevator and then use the Paraglider to land on top of this Windmill. Seriously, don't even bother with the parkour challenge below the structure. It's awfully glitchy.
- Teak Windmill -- Using the two counterweights, you can climb up to pretty much the top of the Windmill. Just jump to the platform you reach at the top and then take the ladder to the fuse box.
Which Windmill did you need help locating? Let us know in the comments below, and check out our Dying Light 2 guide for much more help and information.


Comments 0
Wow, no comments yet... why not be the first?
Leave A Comment
Hold on there, you need to login to post a comment...