Do you need an Aftermath walkthrough for The Callisto Protocol? Aftermath is the third chapter in the game and sees Jacob spend much of his time trying to reach the medical facility. As part of our The Callisto Protocol guide, we're going to share an Aftermath walkthrough that helps you through every part of the level, including puzzles and combat. There are 6 Implant Bios and 2 Audio Logs in this chapter.
Subscribe to Push Square on YouTube168k
The Callisto Protocol: Aftermath Walkthrough

The third chapter immediately picks up after the conclusion of Outbreak, with a single corridor to walk or jog down. There'll be another hologram to watch at the end, then you'll be told to find Elias. Walk around the security unit at the bottom of the stairs and you'll be immediately attacked by an enemy on the other side of the door ahead. Dispose of it, then head through into Access Hall 0573. On the other side, Elias will pull you into a room to keep you safe from the enemies.
He'll lead you through the Security D505 door, but before you do, search the lockers for Health Gel and Callisto Credits. Shimmy on through and Elias will give you a gun off a dead body. First open the chest to your right to get Callisto Credits, a Health Injector, and an Energy Convertor, then interact with the Reforge station. You should have enough Callisto Credits to buy the BI-55 Pistol. Doing so unlocks the Paper Jams Trophy.
If you've been actively collecting Callisto Credits, you can return to the Reforge station after the cutscene with Elias to buy a few upgrades. Doing so will unlock the Reforged Trophy. When you're ready, exit via the open door. You'll now have the chance to test your new BI-55 Pistol on an enemy — use a combination of melee attacks and bullets to take it down.
Head into Lift D513 on your left and take it down into a poorly lit corridor. There's another enemy to kill up ahead, where you'll receive a tutorial for sneaking up on one and performing a Quick Kill. At the top of the staircase will be another enemy to dispatch, but you can't sneak up on this one. Use melee attacks and bullets to down it.
Before heading down the main path to Recreation A225, take the corridor on your left, grabbing the Callisto Credits and Hand Cannon Ammo from the cells as you go. Take the ladder down, then climb down into the larger cell block area. The path to your left is a dead end, but you take a right and follow the path around to the end, you'll find a chest with Hand Cannon Ammo and a Pristine Energy Convertor inside. Two enemies will spawn in this area, so look out for them as you go.
Retrace your steps and head through the open space on the floor, then climb the ladder. Go through the door and you'll be back where you started, with Recreation A225 ready for you.
Manoeuvre around all the debris and rubbish into a smaller room with a vent inside you can crawl through. At the other end, you'll need to crouch and sneak by some enemies; your best bet is to perform Quick Kills on them. Once they're dead, approach the locked Laundry B202 door. You'll be told to find the right credentials in order to unlock the door. They're located on the dead body next to the security unit. Interacting with it gives you Implant Bio #1: Sgt. Eric Jane.
Implant Bio #1: Sgt. Eric Jane
When you need to find the right credentials to unlock the Laundry B202 door, interact with the body next to the malfunctioning security unit. This will hand you Implant Bio #1: Sgt. Eric Jane. Be sure to view it in your inventory.
Now you have the right credentials, approach the Laundry B202 door and it'll automatically unlock for you. Follow the path up ahead into a sort of working factory area, past an enemy locked up in a cage. Another foe will jump out from the floor vent, though, so kill it. If you follow the linear path around, you'll now be faced with two choices: unlocked doors to both the left and right.
Begin by taking the path on your right and head down into a room full of futuristic washing machines. One of them is still operational, and if you interact with it, you'll need to kill an enemy in a quick time event. Continue on into Office B112 to find Implant Bio #2: Ofc. Pruitt Matos.
Implant Bio #2: Ofc. Pruitt Matos
After entering the Laundry B202 door, you'll stumble upon a working factory. At the end of the area are two doors you can take, one on the left and the other on the right. Take the right-hand door and follow it through an area full of washing machines until you find Office B112. On the floor will be Implant Bio #2: Ofc. Pruitt Matos.
In the back of Office B112 is a chest containing more Hand Cannon Ammo and another Pristine Energy Convertor. There's nothing inside Office B111, so return to the working factory area and head through the other main door. The Maintenance B414 door on your immediate left is the main path, but first, go forward and crawl through the vent to find two enemies to kill. Then crawl through another vent — this one's a long one — and then take the staircase all the way down and into a hole.
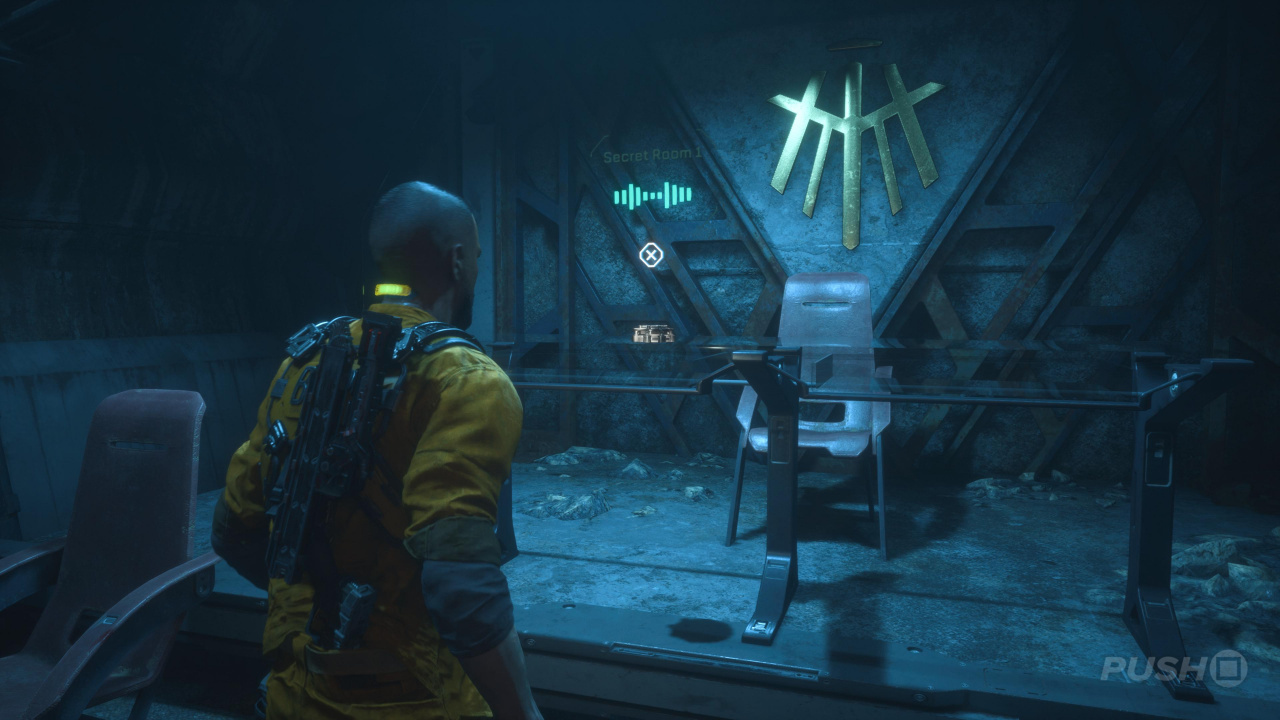
In a very mysterious room at the end of the seemingly underground corridor, you'll find a chest with Hand Cannon Ammo and a Pristine Energy Convertor inside and Audio Log #1: Secret Room 1 on a table at the back of the room.
Audio Log #1: Secret Room 1
When you happen upon a working factory area immediately after entering the Laundry B202 door, you'll be able to take paths leading both left and right through unlocked doors. Take the left-hand one, and follow it until you need to crawl through a vent to reach the room ahead of you. Kill the two enemies here, then crawl through another vent and take the staircase down. Climb down the hole, then shimmy into the room you find. Audio Log #1: Secret Room 1 will be on a table in the back.
Return to the corridor behind you and take the ladder up in the elevator shaft. You can now return to the Maintenance B414 door and continue progressing. An enemy will ambush you through the second window once inside, so be prepared. Follow the path around and you'll find Medical Ward C101. On the other side of the door will be Implant Bio #3: Dr. Ewan Hayes.
Implant Bio #3: Dr. Ewan Hayes
After opening the door labelled Medical Ward C101, the Implant Bio #3: Dr. Ewan Hayes will be on a body directly in front of you.
Continue along the corridor and there'll be a chest with Hand Cannon Ammo and Callisto Credits inside as you go. At the very end, shimmy through the Operating C104 door and Jacob will automatically take the GRP off a corpse. To use it, aim your weapon with L2 and then press X to grab an enemy. You can then launch it using R2.
Continue along the corridor to view a hologram, and then press on towards Med Office C105. Two enemies will appear, giving you the perfect chance to test out your new GRP. Before interacting with the console next to Med Office C105, be sure to smash the cabinet next to it with your Stun Baton to grab a GRP Battery Pack and Health Gel. To progress, take the Gate Fuse from the door you used to enter the room and place it in the console next to Med Office C105. Two more enemies will spawn when you go to do this so be careful, especially if you're low on health.
Past the door, go forward to find supplies like another GRP Battery Pack, a Health Injector, Callisto Credits, Hand Cannon Ammo, and Health Gel. There's also a Reforge station here for you to buy some upgrades. We recommend upgrading the GRP. Now return to the entrance and head through the Med Observation C108 door. Follow the path, open the door, and you'll happen upon quite a gruesome scene. On the ground here will be Implant Bio #4: Ofc. Dachs Symmons.
Implant Bio #4: Ofc. Dachs Symmons
In the room with corpses hanging from the ceiling, Implant Bio #4: Ofc. Dachs Symmons will be on the floor along the main path through.
Before taking a left down to Maintenance Lift C103, walk forward and follow the narrow path around to a box you can stomp on for some Callisto Credits. With them in hand, head for the lift and shimmy through. A cutscene will see Jacob fall even deeper into the prison. A new enemy will appear as you leave the elevator shaft, which you can kill with a quick time event. Climb up to the ledge above to your left, deal with the new enemy once more, and then climb back down into the new area.
With a few more enemies to deal with down here, follow the path to the right of the active fan. There'll be another enemy here, but get behind the fan to find a chest containing a Health Injector, Hand Cannon Ammo, and a Pristine Energy Convertor. Also, on the ground is Implant Bio #5: Ofc. Kerry Brown.
Implant Bio #5: Ofc. Kerry Brown
Following the cutscene in which Jacob falls down the elevator shaft and then quickly encounters a new enemy type, you'll make your way through this new area, eventually finding a big active fan. Follow the path around to the right of it and Implant Bio #5: Ofc. Kerry Brown will be on a body just behind it.
Once you're ready, climb up the ledge to your right and be ready to face off against another four enemies. There's a Health Injector on the wall if you need it, and take advantage of the small red exploding container for some easy kills. Once they're dead, you'll find a Gate Fuse on the corpse next to the locked door labelled Workshop D302. The main path would have you insert it into the nearby console, but if you return back to the room just beyond the elevator shaft you fell down, there's another console you can use the Gate Fuse on.
Insert it here, crawl through the vent, and you'll be able to grab the Skunk Gun Schematic and an Energy Convertor. With those in hand, return to the SHU Access D303 door and push forward. Use the SHU Lift at the end of the corridor to reach a command centre with Elias inside. When you go downstairs, you'll unlock the If the SHU Fits... Trophy.
Down here you'll find a Reforge station where you can upload the Skunk Gun Schematic, which unlocks the Skunkworks Shotgun for purchase (800 Callisto Credits). Get on the gondola Elias has called over for you. There'll be three enemies waiting for you on the other side, so use your GRP while you're crossing to throw a few of them about and then kill the ones left with melee attacks and bullets.
Have a quick look around this area and you'll find two Health Injectors and two GRP Battery Packs. Remove the two Gate Fuses from the consoles in the back wall and head back towards the entrance. You'll notice some crates on either side have now lit up, letting you know you can climb up to the area above. Up here you'll find another Health Injector and Implant Bio #6: Tadhg Song.
Implant Bio #6: Tadhg Song
After crossing over into the SHU via the gondola, you'll take two Gate Fuses from consoles on the back wall and climb up some crates to place them elsewhere. On this level as well is Implant Bio #6: Tadhg Song.
Place the Gate Fuses in the two consoles up above. You'll now need to survive whilst the door opens. A number of enemies will spawn, so kill them using the GRP, melee attacks, and your gun. This is the perfect opportunity to unlock the Workplace Hazard Trophy, which requires you to use your GRP and throw an enemy into one of the active pieces of machinery. Now survive until the door opens; we recommend throwing enemies with the GRP as much as possible. Once roughly 10 enemies have been and gone, the process will finish and you'll be able to go through the door.
Take the stairs up, killing the legless enemy as you go, and interact with the Reforge station if you've got enough Callisto Credits. There's also an Energy Convertor in the back of the room you can sell. When you're ready, interact with the SHU controls. Head back downstairs and use the lift to go down. A second enemy will appear alongside the one you can already see on the platform below, so try to separate them to make the fight more manageable.
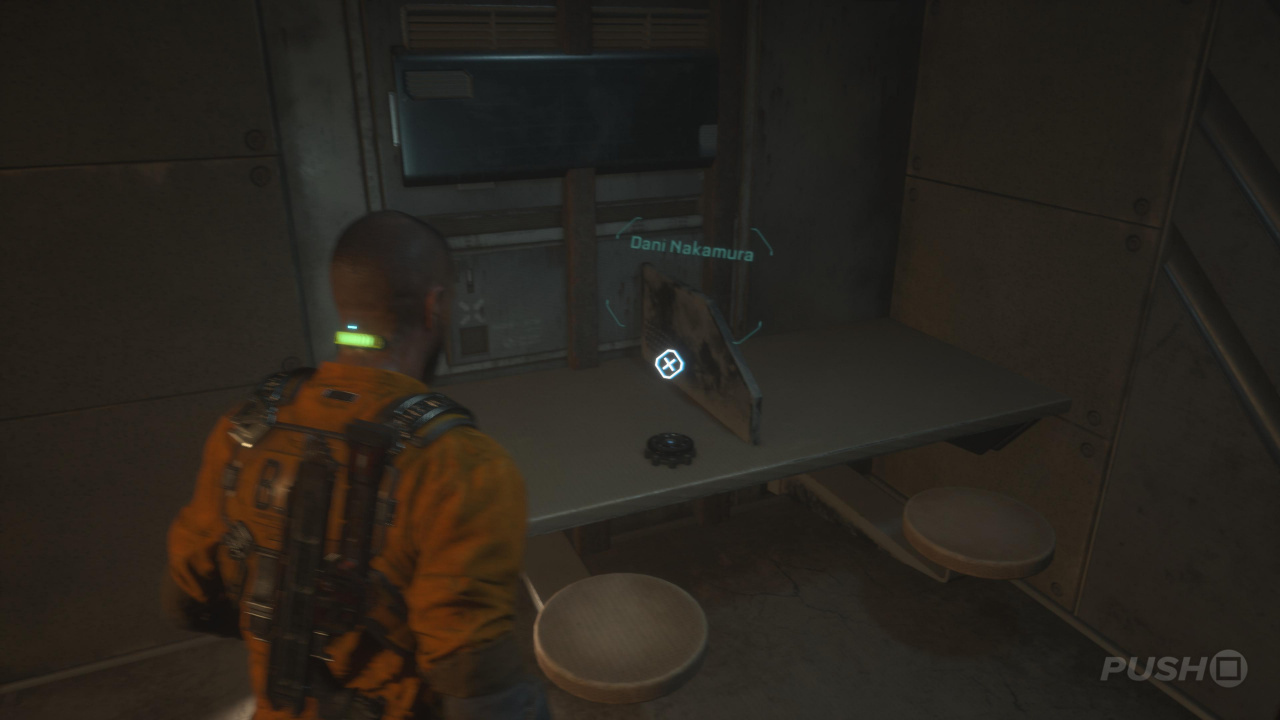
A third enemy — that's on fire — will then spawn at the end of the platform, but this one should be fairly easy to kill. When you're done, there's a console you can interact with in the middle on the right-hand side. You'll end up locked inside the cell as part of the cutscene, but while it's moving, you can grab Audio Log #2: Dani Nakamura.
Audio Log #2: Dani Nakamura
When you're locked inside a moving cell, Audio Log #2: Dani Nakamura will be on the table.
After a short while, you'll be able to interact with the panel next to the door, and then the door itself to escape. Crawl through the vent and then kill the enemy that immediately appears after you've gotten out the other side. Shimmy between the pipes, then climb over another one, only for an enemy to launch itself at you and grab on with its mouth. Kill it in the quick time event, then continue along the linear path. You'll eventually turn a corner where two more smaller foes will jump out, forcing a quick time event.
Go down the stairs and shimmy between yet more pipes, then down a ladder at the end. At the bottom another enemy will appear out of a vent, so quickly dispose of it. In order to progress, break the mesh covering the second vent next to the ladder and climb through.
When you drop down, there'll be another enemy to beat and the main objective will tell you to make it through the security sector. Pass through the open security gate, grabbing the Health Gel as you go. In this next area, you need to take down the security unit. Targets its head with your BI-55 Pistol, but be very careful: it's a one-hit kill if the security unit successfully lands a blow. It'll take around five bullets to destroy it, which automatically unlocks the Terminated Trophy. If you stomp on the security unit afterwards, you'll get a Decoder.
Press on, and a standard enemy will spawn just beyond the crates in front of you. Before going through the vent ahead, check the left-hand side of the area for an Energy Convertor. Follow the linear path — through the vent and shimmying between gaps — until you come to a trap. There's a Health Injector and Callisto Credits you can grab from a vent on your left, but the spinning blades pose a much bigger problem. They will move up and down the hallway at regular intervals, so use the gaps on the side to stay safe. At each interval, an enemy will burst out of a vent. Grab it with the GRP and place it in the centre of the corridor so the spinning blades kill it. Once you reach the end, quickly get into the vent and crawl through.
In the following room, approach the window for a cutscene. Afterwards, follow the path around to find three lockers containing Callisto Credits and Hand Cannon Ammo, then go down the hatch after interacting with the panel. Reaching the bottom of the ladder completes the chapter.
The Callisto Protocol: Aftermath Objectives
- Locate Elias in Security
- Print a Weapon at the Reforge
- Exit Security
- Locate the Medical Facility
- Find a Guard's Corpse
- Open Laundry B202 Door
- Locate the Medical Facility
- Reach the Back Exit
- Look for an Elevator
- Find a Way Out of the Basement
- Unlock Door D303 with a Fuse
- Reunite with Elias
- Use Gondola to Reach the SHU
- Restore Power
- Locate SHU Control Room
- Activate SHU Controls
- Take Elevator Down to the Cell
- Free the Inmate
- Reach the Tram Station
- Get Through Security
- Exit the Station
Was our Aftermath Walkthrough for The Callisto Protocol helpful? Refer to our The Callisto Protocol guide for much more information, and share any further tips in the comments below.


Comments 1
After collecting the 2nd implant, your guide states there is nothing in Office B111. There is, it's just not obvious. Crouch under the broken door and you will see two cabinets, break the glass and you will find Two Health Gels and some Callisto Credits.
Show Comments
Leave A Comment
Hold on there, you need to login to post a comment...