
In this Cyberpunk 2077 PS5, PS4 Trophy roadmap, we're going to explain how to unlock the Platinum Trophy in CD Projekt RED's behemoth sci-fi role-playing game, Cyberpunk 2077. As part of our Cyberpunk 2077 guide, we're going to outline all of the Trophies and how to unlock them. We've also included a Trophy roadmap, which will help you to plan out your playthrough in order to ensure you unlock the Platinum Trophy at the end.
Cyberpunk 2077: How to Unlock the Platinum Trophy
Cyberpunk 2077 is a long and deep game, but assuming you're willing to spend almost 100 hours in Night City, you shouldn't have too many problems unlocking the Platinum Trophy. While there are multiple ending Trophies, these are primarily determined by a single dialogue choice in the penultimate mission, and you can replay this part of the campaign as many times as you like in order to see all of the possible permutations. In fact, as long as you select the Sure, Just One More Gig option after completing the core quest, you'll be taken back to the point of no return, allowing you to mop up any remaining Trophies at your leisure. The one thing you need to be aware of is that you must save Takemura during the Search and Destroy mission in order to unlock The Devil Trophy. For more information on that, refer to the following: Cyberpunk 2077: How to Save Takemura in Search and Destroy.
There are more Trophies, while technically all obtainable in a single playthrough, that may prove potentially problematic, however. First up, Stanislavski's Method and Autojock. When given the option to select a dialogue response pertaining to your Lifepath (See Also: Cyberpunk 2077: Which Lifepath Should You Choose?), be sure to always select it as there are limited options to do this and you need at least 10 responses of this nature to unlock Stanislavski's Method. Similarly, Autojock requires a lot of money, so while you may be tempted to spend liberally, we'd recommend saving your money as much as possible, at least until you've purchased all of the vehicles. Try to save side-quests and open world activities until much later as well, because enemies will drop more valuable loot later on which you can then sell.
Before assigning all of your Attribute Points, you should also pay attention to the following Trophies: Ten Out of Ten, Master Crafter, V for Vendetta, and Rough Landing. Our recommendation would be, if possible, to start stockpiling Attribute Points once you've completed the main campaign. Once you have around 17 or so Attribute Points saved up, make a hard save and follow the individual guides for these associated Trophies. Once you've unlocked them all, you can then spend the Attribute Points however you like to create your desired Cyberpunk 2077 character build.
One other Trophy you should pay attention to is the Breathtaking Trophy, as while you'll unlock most of the items naturally by playing the game, if you fail to snatch one of the items while you have the opportunity, you won't be able to return to the area where it's located. It's also possible that you may accidentally sell or disassemble Johnny's Gun, which could render this Trophy unachievable.
Cyberpunk 2077 Trophies: Does Difficulty Matter?
No, you can play Cyberpunk 2077 on whatever difficulty you feel comfortable with and still unlock all of the Trophies in the game. Obviously, if you want to finish the game as quickly as possible, then Easy will be your best option. However, if you want more of a challenge then feel free to turn the difficulty up. It doesn't matter what you select, as you'll still be able to earn the Platinum Trophy. Just go with what you enjoy.
Cyberpunk 2077 Trophies: Are Any Missable?
Technically, you can unlock all of Cyberpunk 2077's Trophies in a single playthrough, however you should pay attention to Stanislavski's Method, Autojock, Ten Out of Ten, Master Crafter, V for Vendetta, and Rough Landing because all of them are potentially missable. You'll also need to ensure you save Takemura in Search and Destroy (See Also: Cyberpunk 2077: How to Save Takemura in Search and Destroy) and play the final mission multiple times in order to get all of the endings (See Also: Cyberpunk 2077: All Endings and How to Unlock Them). Select Sure, Just One More Gig after the credits conclude to be taken back to the point of no return, allowing you to see out all of the potential outcomes.
Cyberpunk 2077: All PS5, PS4 Trophies
There are a total of 45 Trophies to unlock in Cyberpunk 2077. Below you'll find a full list of all the game's Trophies, as well as descriptions and strategies for how to obtain them.
Never Fade Away
Platinum: Unlock all Trophies
As with all PlayStation games, you'll unlock the Platinum Trophy once you've obtained all of the other Trophies in the game.
The Fool
Bronze: Become a Mercenary
You'll unlock this Trophy as part of the main story. You just need to work your way through the prologue chapter, and it'll pop shortly after the tutorial.
The Lovers
Bronze: Steal the Relic
You'll unlock this Trophy as part of the main story. Simply complete the mission named The Heist to unlock this Trophy.
The Hermit
Bronze: Find Alt Cunningham
You'll unlock this Trophy as part of the main story. Simply complete the mission named Transmission to unlock this Trophy.
The Wheel of Fortune
Bronze: Interrogate Anders Hellman
You'll unlock this Trophy as part of the main story. Simply complete the mission named Life During Wartime to unlock this Trophy.
The High Priestess
Bronze: Talk with Hanako Arasaka
You'll unlock this Trophy as part of the main story. Simply complete the mission named Search and Destroy to unlock this Trophy. It's worth noting that in order to unlock The Devil Trophy, you'll need to keep Takemura alive in this quest. You can learn how to do that through the following link: Cyberpunk 2077: How to Save Takemura in Search and Destroy.
The World
Gold: Complete the main storyline
You'll unlock this Trophy as part of the main story. Simply complete the final mission and reach the credits to unlock this Trophy. It doesn't matter which ending you select (See Also: Cyberpunk 2077: All Endings and How to Unlock Them), so just pick the one that feels right for your character. If you select the option Sure, Just One More Gig after the credits have concluded, then you'll be taken back to the point of no return, allowing you to mop up any Trophies you haven't unlocked yet.
The Devil
Silver: Help Takemura avenge the death of Saburo Arasaka
You need to help Takemura avenge the death of Saburo Arasaka. You can find out the steps you need to follow to unlock this Trophy through the following link: Cyberpunk 2077: All Endings and How to Unlock Them. Please note that in order to unlock this Trophy, you'll need to keep Takemura alive in the mission Search and Destroy: Cyberpunk 2077: How to Save Takemura in Search and Destroy.
The Star
Silver: Leave Night City with the Aldecaldos
You need to leave Night City with Panam Palmer and the Aldecaldos. You can find out the steps you need to follow to unlock this Trophy through the following link: Cyberpunk 2077: All Endings and How to Unlock Them.
The Sun
Silver: Become a legend of the Afterlife
You need to become the legend of Night City. You can find out the steps you need to follow to unlock this Trophy through the following link: Cyberpunk 2077: All Endings and How to Unlock Them.
Temperance
Silver: Let Johnny Silverhand keep your body
You need to let Johnny Silverhand assume control of your body. You can find out the steps you need to follow to unlock this Trophy through the following link: Cyberpunk 2077: All Endings and How to Unlock Them.
To Protect and Serve
Bronze: Complete River Ward's storyline
Simply complete all of River Ward's side-quests, culminating in Following the River. You'll unlock River Ward's questline shortly after completing the Life During Wartime quest, when you'll receive a call from Elizabeth Peralez.
To Bad Decisions!
Bronze: Complete Kerry Eurodyne's storyline
Simply complete all of Kerry Eurodyne's side-quests, culminating in Boat Drinks. You'll access Kerry Eurodyne's questline after unlocking the Bushido and Chill Trophy.
Judy vs Night City
Bronze: Complete Judy Alvarez's storyline
Simply complete all of Judy Alvarez's side-quests, culminating in Pyramid Song. You'll unlock Judy Alvarez's questline as you work your way through the main story. It begins with the quest Both Sides, Now.
Life of the Road
Bronze: Complete Panam Palmer's storyline
Simply complete all of Panam Palmer's side-quests, culminating in Queen of the Highway. You'll unlock Panam Palmer's questline as you work your way through the main story. It begins with the quest Riders on the Storm.
Bushido and Chill
Bronze: Watch Bushido X with Rogue
Simply complete all of Rogue's side-quests, culminating in Blistering Love. You'll unlock Rogue's questline as you work your way through the main story. It begins with the quest Chippin' In.
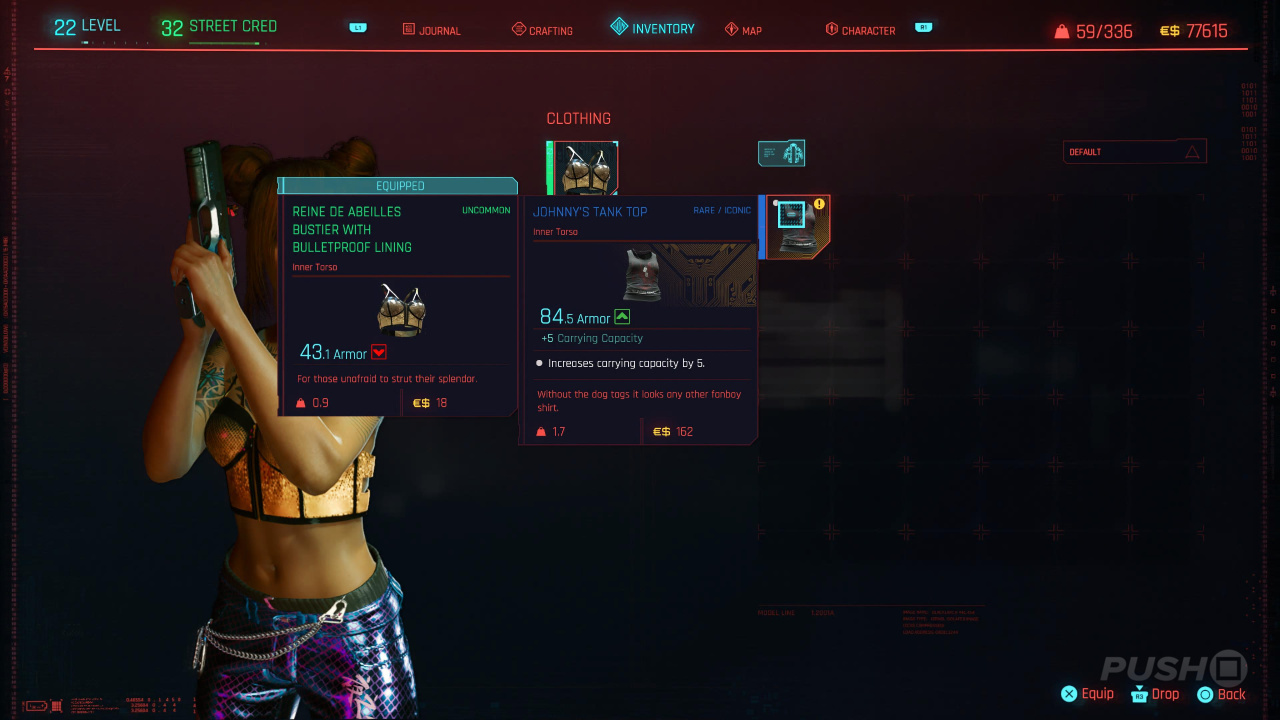
Breathtaking
Silver: Collect all items that once belonged to Johnny Silverhand
You'll unlock clothing items and weapons pertaining to Johnny Silverhand while completing certain quests and missions in the game. Please note that some of these are missable, so take extra care when playing any of the missions outlined below. While you also can't sell or disassemble any of Johnny Silverhand's clothing items, be careful you don't accidentally sell or disassemble his firearm.
All Johnny Silverhand Items
| Item | Quest | Missable |
|---|---|---|
| Johnny's Tank Top | Tapeworm | No |
| Johnny's Aviators | Chippin' In | No |
| Johnny's Samurai Jacket | Chippin' In | No |
| Johnny's Gun | Chippin' In | No, but make sure you don't accidentally sell or disassemble it |
| Johnny's Car | Chippin' In | Yes, but it's not required for the Trophy. Either kill Grayson and loot his body, or spare him for the keys to a container, with the car inside |
| Johnny's Pants | Psychofan | Yes, be sure to loot the suitcase in the room before Kerry Eurodyne's guitar, or there's no opportunity to return to this area |
| Johnny's Shoes | Family Heirloom | No |
It's Elementary
Silver: Complete all gigs and NCPD Scanner Hustles in Watson
Cyberpunk 2077 is divided into different districts, each filled with activities for you to complete. Gigs are effectively side-quests denoted by yellow map markers, while NCPD Scanner Hustles are denoted by blue icons. You need to clear all of the activities in Watson to unlock this Trophy.
I Am the Law
Bronze: Complete all Cyberpsycho Sightings
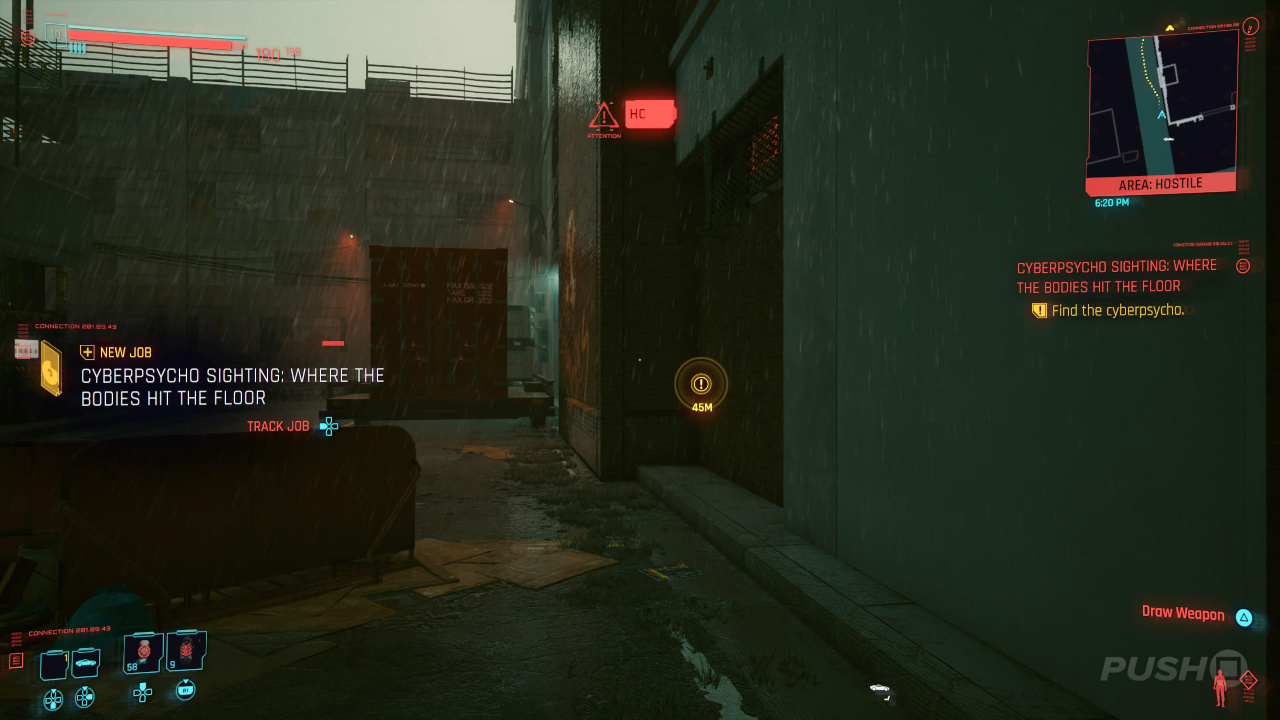
Cyberpsycho Sightings are a type of gig in Cyberpunk 2077 which require you to defeat mini-boss characters with short stories attached. These are challenging combat encounters, so make sure you come to these well prepared. There are 17 Cyberpsycho Sightings listed specifically in the game, although you will encounter further boss fights of this nature as part of other quests and missions. You will find all of these listed under the Gigs category of the Journal.
Greetings from Pacifica!
Silver: Complete all gigs and NCPD Scanner Hustles in Pacifica
Cyberpunk 2077 is divided into different districts, each filled with activities for you to complete. Gigs are effectively side-quests denoted by yellow map markers, while NCPD Scanner Hustles are denoted by blue icons. You need to clear all of the activities in Pacifica to unlock this Trophy.
The Wasteland
Silver: Complete all gigs and NCPD Scanner Hustles in the Badlands
Cyberpunk 2077 is divided into different districts, each filled with activities for you to complete. Gigs are effectively side-quests denoted by yellow map markers, while NCPD Scanner Hustles are denoted by blue icons. You need to clear all of the activities in the Badlands to unlock this Trophy.
Little Tokyo
Silver: Complete all gigs and NCPD Scanner Hustles in Westbrook
Cyberpunk 2077 is divided into different districts, each filled with activities for you to complete. Gigs are effectively side-quests denoted by yellow map markers, while NCPD Scanner Hustles are denoted by blue icons. You need to clear all of the activities in Westbrook to unlock this Trophy.
Mean Streets
Silver: Complete all gigs and NCPD Scanner Hustles in Heywood
Cyberpunk 2077 is divided into different districts, each filled with activities for you to complete. Gigs are effectively side-quests denoted by yellow map markers, while NCPD Scanner Hustles are denoted by blue icons. You need to clear all of the activities in Heywood to unlock this Trophy.
The Jungle
Silver: Complete all gigs and NCPD Scanner Hustles in Santo Domingo
Cyberpunk 2077 is divided into different districts, each filled with activities for you to complete. Gigs are effectively side-quests denoted by yellow map markers, while NCPD Scanner Hustles are denoted by blue icons. You need to clear all of the activities in Santo Domingo to unlock this Trophy.
City Lights
Silver: Complete all gigs and NCPD Scanner Hustles in City Center
Cyberpunk 2077 is divided into different districts, each filled with activities for you to complete. Gigs are effectively side-quests denoted by yellow map markers, while NCPD Scanner Hustles are denoted by blue icons. You need to clear all of the activities in the City Center to unlock this Trophy.
Full Body Conversion
Bronze: Install at least one implant in each system and body part
You can purchase install implants at Ripperdocs, which are denoted on the map by a white pair of surgeon's scissors. There will be more implants available as you progress through the game and increase your Street Cred. You need to install at least one implant in each available slot. We'd recommend purchasing the cheaper options, as you'll need to save money for the Autojock Trophy. Alternatively, make a manual save with lots of money, purchase what you need for the Trophy, and then reload your save.
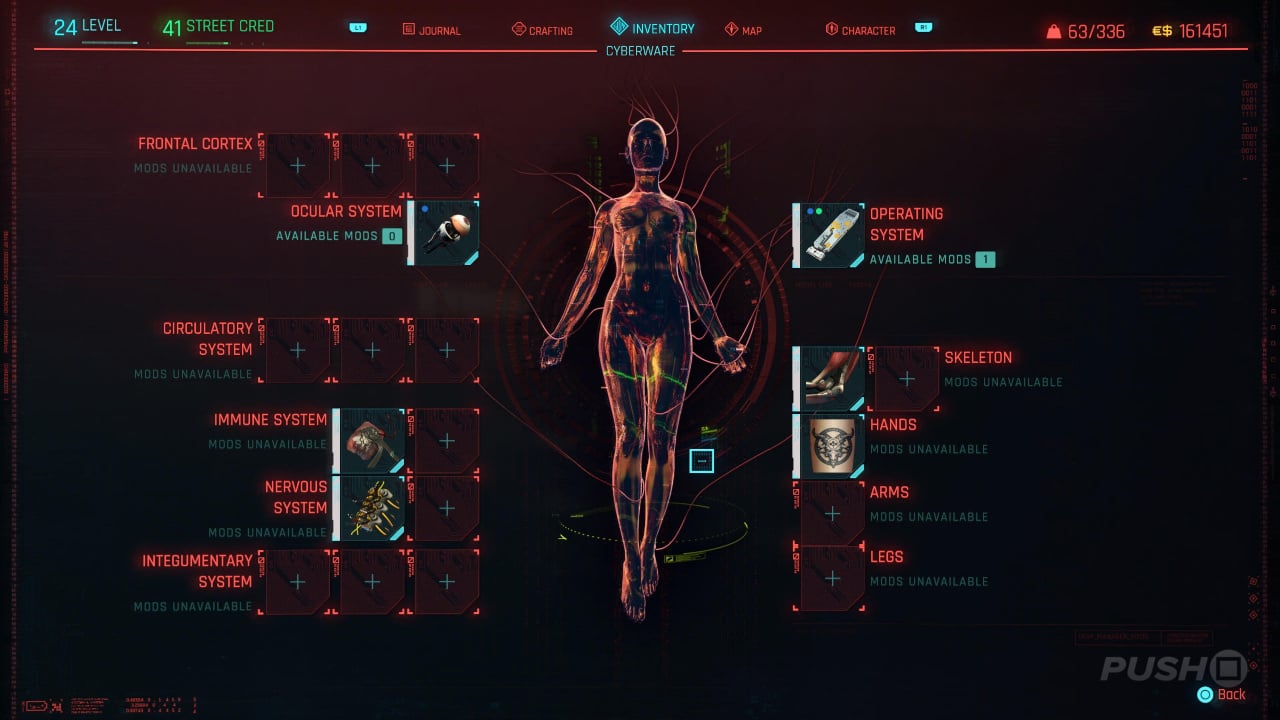
You'll need at least one implant in each of the following categories:
- Frontal Cortex
- Ocular System
- Circulatory System
- Immune System
- Nervous System
- Integumentary System
- Operating System
- Skeleton
- Hands
- Arms
- Legs
Gun Fu
Bronze: Kill or incapacitate 3 enemies in quick succession with a revolver or pistol in close combat
You'll most likely unlock this without trying as you play through the campaign, most likely when you assume the role of Johnny Silverhand, as he has a very powerful revolver in his inventory. Your objective is to kill three enemies in around three seconds when you're positioned five metres or less from them. Your best bet, if you haven't unlocked it yet, is to wait until you have a high-powered revolver towards the end of the game, which is capable of killing foes with one shot. Then head to an NCPD event, group some thugs together, and take them out as quickly as possible.
Christmas Tree Attack
Bronze: Complete a Breach Protocol with a minimum of 3 daemons uploaded
While this can technically be completed with the stock OS you get at the start of the game, we'd recommend upgrading to one with a bigger Buffer size. You'll want to put a couple of perk points into Big Sleep and Mass Vulnerability, under the Breach Protocol skill tree. Then hack a security camera and use the Breach command. Your goal is to complete all three sequence strings in a single hack. This is much easier to do when you have an OS with a larger Buffer size.
Ten Out of Ten
Bronze: Reach the max level in any skill
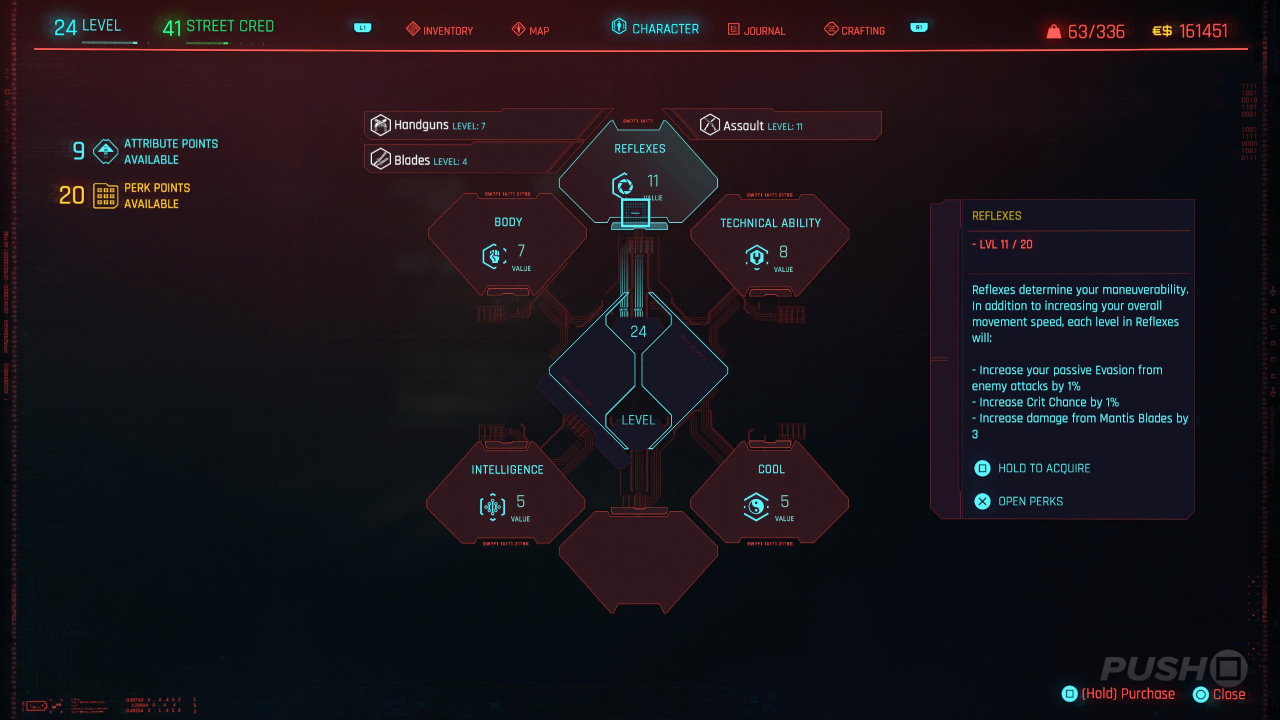
Much like in The Elder Scrolls V: Skyrim, you'll upgrade your skills by playing Cyberpunk 2077 and repeating certain tasks, rather than spending Skill Points. However, in order to reach the maximum skill, you'll need to spend Attribute Points in order to increase the maximum level you can achieve. For example, in order to reach Assault Level 20, you'd need to level up the Reflexes to 20 and then use Assault Rifles until you reach the maximum level and unlock the Trophy. To check how close you are, simply push the touchpad and select Character > Attributes. Then see which of your skills you've levelled up the most. Because this is potentially missable, we'd recommend saving up at least 17 Attribute Points, and then making a manual save so you can spend them as you need to get this Trophy.
Gunslinger
Bronze: Shoot an enemy grenade in midair with a revolver
This is a pretty straightforward Trophy to unlock, it just requires a bit of skill. Make sure you're using a revolver as your primary weapon and look out for any grenades being tossed your way. If you can shoot one out of the air, then the Trophy will be yours. This is easier to unlock if you have the time slowing augmentation, as described in The Quick and the Dead Trophy.
Two Heads, One Bullet
Bronze: Kill or incapacitate 2 enemies with the same sniper rifle shot
This Trophy is best unlocked if you lower the game difficulty to Easy, as this reduces the HP of enemies and makes it more likely you'll get the two kills or incapacitations you need to unlock the Trophy. The best tactic for this Trophy is to find two policemen standing next to each other on a street corner. Make sure you have a sniper rifle equipped, line up your shot, and fire. If you take them both out with a single shot, you'll unlock the Trophy.
Rough Landing
Bronze: While Berserk cyberware is active, perform a Superhero Landing to kill or incapacitate 2 enemies
Travel to the Ripperdoc in Westbrook on Charter Hill and purchase the Biodyne Berserk MK.1 (€$7,500) from the Operating System Cyberware category. You can then equip it and activate it by simultaneously pushing the L1 and R1 buttons. You need to find an area where two enemies are standing close together, and use this Cyberware to kill or incapacitate them by landing in between them. Try creating a manual save before attempting this so you can easily retry if it goes wrong.
Stanislavski's Method
Bronze: Use a dialogue option related to V's life path 10 times
While your chosen Lifepath doesn't mean much in Cyberpunk 2077 (See Also: Cyberpunk 2077: Which Lifepath Should You Choose?) it does unlock some additional dialogue options you can use in the game. There are three lifepaths you can select: Nomad, Streetkid, and Corpo. When you have the option to use one of these dialogue choices, you'll see your chosen Lifepath listed to the left of the dialogue decision. Be sure to select this option ten times to unlock the Trophy.
Autojock
Silver: Buy all vehicles available for purchase
You'll need a lot of money to buy all of the available vehicles in Cyberpunk 2077, so we'd recommend you don't overspend elsewhere in the game while you save up for this one. Unlike in games like Grand Theft Auto V, there's no specific car dealership; instead you'll be contacted by people who want to sell you cars, and these will be listed in a side-quest category called Rides. You can then track these missions to go to the seller and purchase the car. You'll need to be Street Cred 50 to unlock them all, so you'll need to get the Legend of the Afterlife Trophy first. If you're not planning to use exploits, then we'd recommend you don't spend any money throughout the campaign and begin saving from the start.
Master Crafter
Bronze: Craft 3 Legendary items
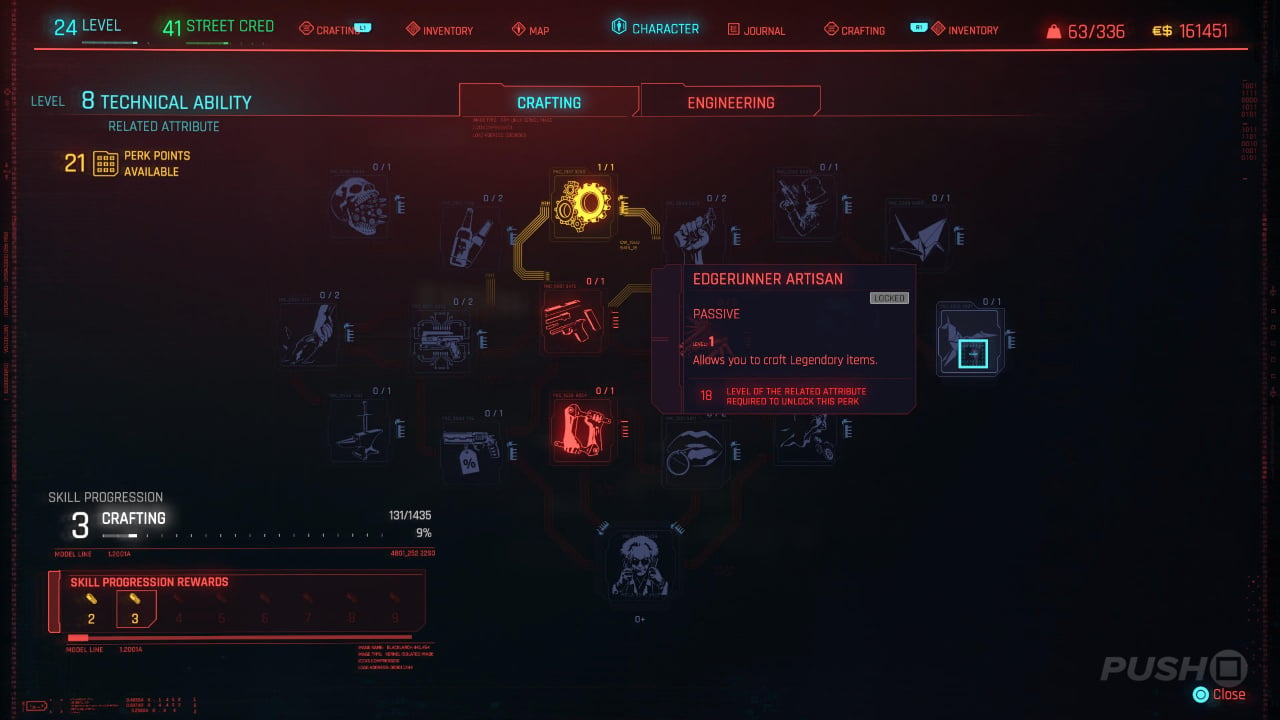
You'll need to put at least 18 Attribute Points into Technical Ability in order to unlock this Trophy, making it potentially missable. From there, you can purchase the Edgerunner Artisan perk which allows you to craft Legendary items. We'd also recommend you get True Craftsman, Grease Monkey, and Tune Up. These will allow you to craft Legendary Components out of Epic Components, enabling you to unlock the Trophy. You can make a manual save before doing this, allowing you to spend your perk points elsewhere once you've unlocked the Trophy.
Daemon in the Shell
Bronze: Kill or incapacitate 3 enemies with one "Detonate Grenade" quickhack
You'll find the Detonate Grenade quickhack on the bodies of enemies randomly. The easiest place to get it is in and around the Chapel Dataerm in Pacifica; head up the stairs and to the left of the road is rooftop hangout with several enemies who all drop purple loot. Kill them until you get the quickhack. You'll then need to purchase an OS from a Ripperdoc that has enough RAM to use the quickhack. Make a manual save before buying one of these so you don't waste your money, especially if you're trying to unlock the Autojock Trophy. Install the quickhack on your new OS, and find a group of enemies all standing closely together. Watson is a good place to do this. Simply trigger the quickhack using the L1 button, and wait for the explosion.
The Quick and the Dead
Bronze: Kill or incapacitate 50 enemies while time is slowed
You'll need to go to a Ripperdocs and purchase a Nervous System Cyberware implant to unlock this Trophy. Depending on which one you get, these effectively allow you to slow time when you're sprinting, sliding, or performing some other kind of activity. Get a feel for how the time slowing mechanic works, and then execute it while killing enemies multiple times in order to unlock the Trophy.
Must Be Rats
Bronze: Perform the Distract Enemies quickhack 30 times without drawing attention to yourself
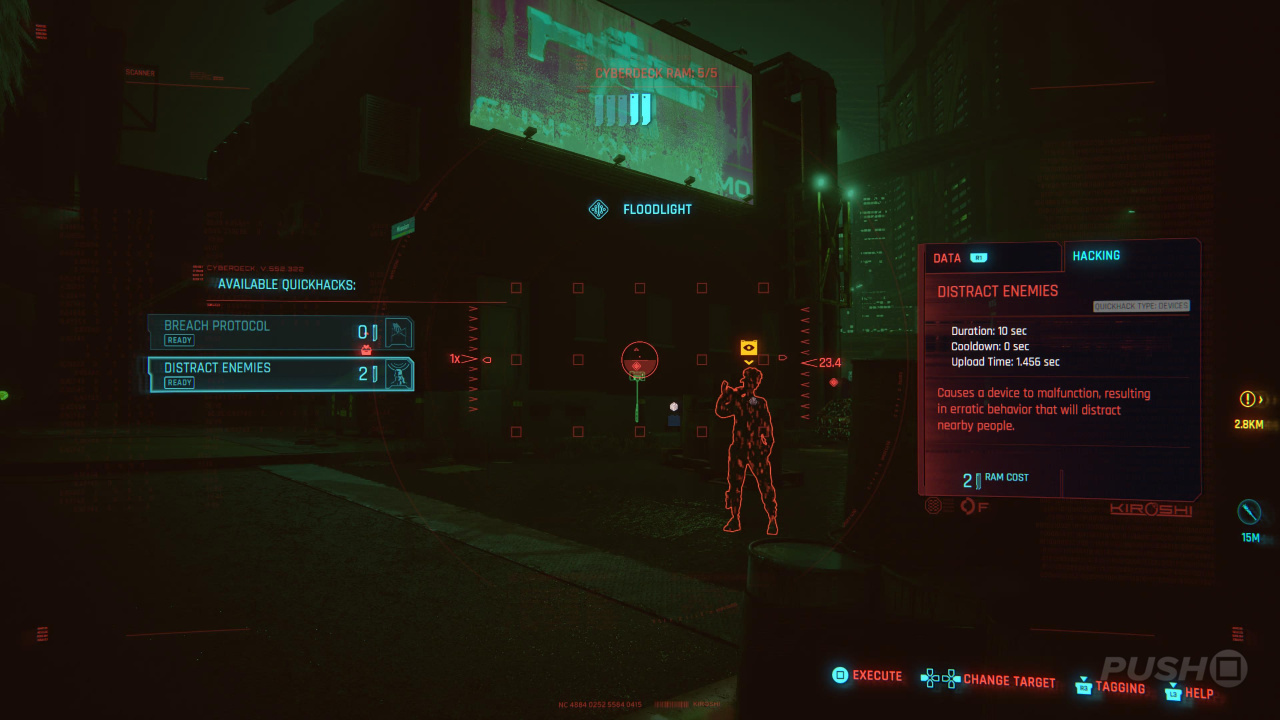
This is a relatively simple Trophy to unlock, but you'll want to pay attention to it earlier in the game so that you don't have to grind it out later. Basically all you need to do is scan green objects in the world using L1 while in stealth. You'll then have the option to Distract Enemies. Use it to get the attention of your foes, and repeat this 30 times over the course of your playthrough to unlock the Trophy.
V for Vendetta
Bronze: After reviving with Second Heart, kill or incapacitate the enemy who killed you within 5 seconds
In order to unlock this Trophy, you'll need to spend 16 Attribute Points into Body, as this is the only way you'll be able to equip the Second Heart cyberware available from Ripperdocs. As a result, this is technically a missable Trophy, so you may want to save up some Attribute Points and make a manual save before finishing it. Once you've got it, equip it and allow an enemy to kill you. You'll be resurrected with full health, and as long as you defeat your attacker, you'll unlock the Trophy for your efforts.
True Soldier
Silver: Kill or incapacitate 300 enemies using ranged weapons
Ranged weapons, in this case, refer to any kind of firearms, such as pistols, revolvers, assault rifles, or sniper rifles. All you need to do is kill or incapacitate 300 enemies using these kinds of weapons to unlock the Trophy.
True Warrior
Silver: Kill or incapacitate 100 enemies using melee weapons
Melee weapons, in this case, refer to katanas, knives, and any other close-quarters combat armaments you may have in your arsenal. All you need to do is kill or incapacitate 100 enemies using these kinds of weapons to unlock the Trophy.
Right Back At Ya
Bronze: Kill or incapacitate an enemy who threw a grenade at you
You'll unlock this Trophy without even trying in all honesty. As the description explains, you just need to kill an enemy who previously threw a grenade at you. Given that so many of the foes in the game toss explosives around, this is a very straightforward gong to unlock.
The Wandering Fool
Silver: Find all the tarot graffiti for the job Fool on the Hill
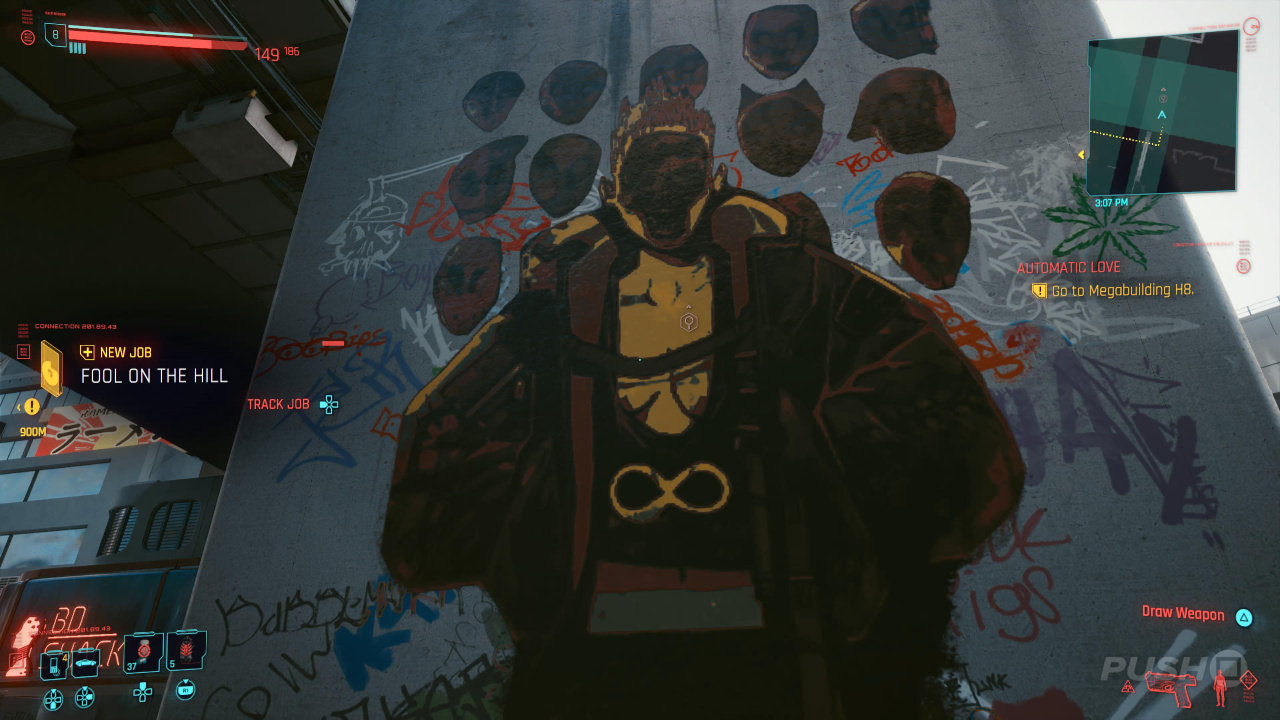
Fool on the Hill is a side-quest that you'll unlock as you progress through Cyberpunk 2077's main storyline. All of the Tarot Card Graffiti Murals are marked on the map, with a small blue symbol. Once you reach the location, you just need to scan them with the L1 button to add them to your inventory. There are a total of 20 Tarot Graffitis to find.
Frequent Flyer
Bronze: Find all fast travel dataterms
Dataterms are effectively fast-travel points within Cyberpunk 2077's world, and they're marked by purple icons on the game's map. Just make sure you're exploring the world thoroughly and this one should come to you naturally as you progress through the game. You don't need to do anything to collect them, just walk or drive near them and they'll be added to your map.
Legend of the Afterlife
Silver: Reach max Street Cred
You can see your Street Cred at any point during your playthrough of Cyberpunk 2077 in the top-left corner of the map. You'll get to around Street Cred 20 for completing the main story, but obviously you'll need to engage with side-quests and other missions in order to reach the maximum, which is Street Cred 50. Our advice for this one: play the game, have fun, and you'll unlock it eventually.
Have you unlocked the Platinum Trophy in Cyberpunk 2077 yet? Be sure to let us know, and refer to our Cyberpunk 2077 guide for more information.


Comments 5
For Rough Landing; https://youtu.be/-ErqDHr3kN4
Does this mean this is a shared list?
Any word on Auto Pop up for trophies? I transferred my save to PS5 but none of the trophies have popped up.
@wildstajan1 You have to earn them again they don't transfer
@Richnj its the same trophies but you have to earn them again
Show Comments
Leave A Comment
Hold on there, you need to login to post a comment...