How do you beat each puzzle in Maquette on PS5 and PS4? Maquette is a brand new game from Annapurna Interactive and Graceful Decay, out now on both of Sony's current consoles. If you're a PlayStation Plus member, you can claim the PS5 version of the game for no extra charge throughout the month of March 2021.
This unique first person puzzle game has some tricky conundrums; maybe you need a helping hand? If you're struggling with any puzzles in Maquette, this guide is for you.
Be aware that this guide contains explicit puzzle solutions, but no story spoilers. Do your best to solve the puzzles yourself. If you really can't figure out the way forward, we have everything lined out for you right here.
Maquette: All Puzzle Solutions
Below, you'll find a walkthrough on how to solve every puzzle in Maquette.
The Gardens (Chapter 1)
The Gardens is very light on actual puzzles. You'll mostly just need to walk through the environment, chilling out with the nice music. You'll know you're heading in the right direction because writing will appear in the environment, developing the story (this is true of the whole game).
The first obstacle in your path is a red door with a lever to the side. Simply pull the lever to open the door.
Continue along the path and you'll come to another locked door. Off to the right you'll find a key. Use this key to open the door. Behind it is another door. Retrieve the key and use it on this other door.
Walk towards the golden tree and you're done with this chapter.
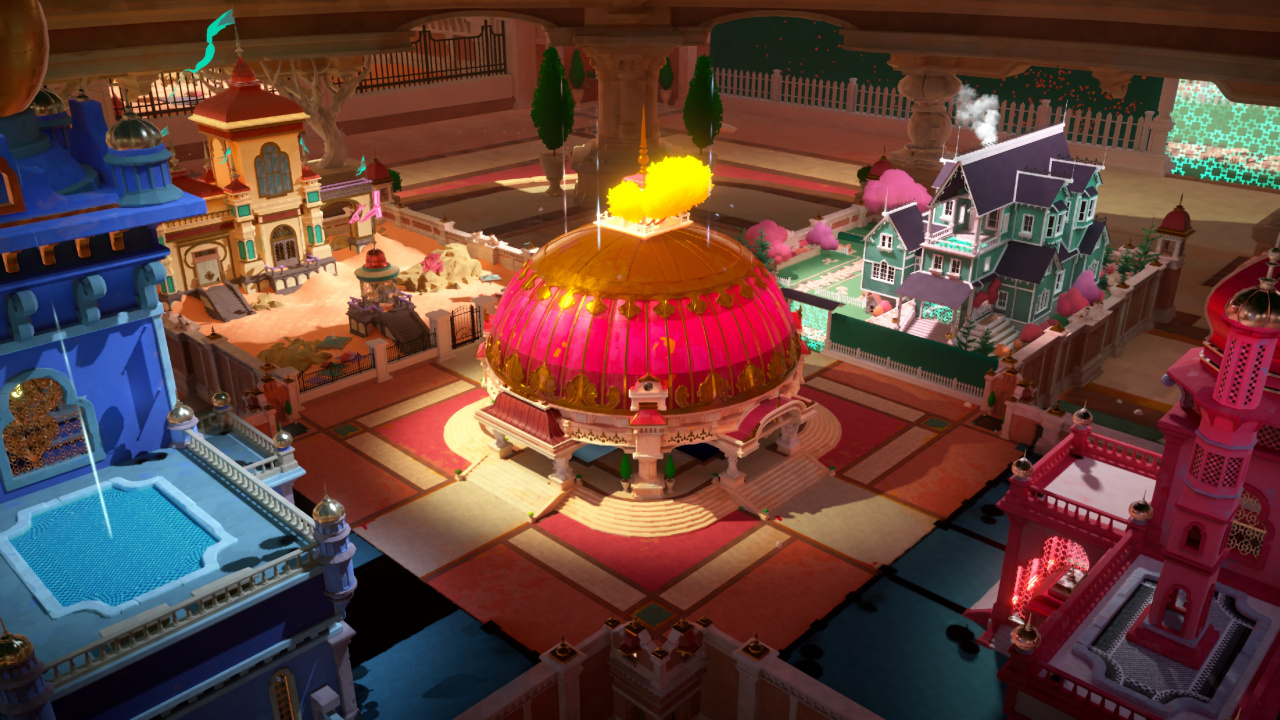
The Maquette (Chapter 2)
To start with, head towards the yellow castle (there's a large red cube nearby). Go inside. After the scene has played out, head to the dome in the middle of the map. This is the titular maquette.
Inside the dome is a smaller version of the same map. You'll be able to see that the red cube is blocking the way to a pair of towers. Because the red cube is smaller inside the dome, you can pick it up. Do so, and move it away from the towers. This allows you to enter this area in the "regular" scale.
Drop down to the grassy area. Look around for a small bridge object — it'll be inside or near an elevator. Pick it up and use the elevator to return to the upper level. Take this bridge inside the dome and place it between the two towers. This will allow you to cross it in the "regular" scale.
Cross the bridge and use the elevator to access the rooftop garden. A scene will play out and an oversized golden ticket will appear. Pick up this ticket.
Return to the dome. Place the ticket on the floor outside the dome, then go inside and pick up the smaller version of the ticket. Take this small ticket to the "regular" scale gateway to the fairground.
Have a wander around the fairground. You'll notice there's a stone pathway that leads to a blank wall. Return to the central dome and find the small scale fairground. Locate the same wall where the path stops and you'll notice there's some stuff behind it. Pull the lever and it'll open the wall up. Return to this location in the regular scale fairground. In the newly opened section, you'll find a key.
You need to use this key to unlock the final locked door in the main area. It leads to a walkway that you can't cross. Go back inside the dome with the key. Find the walkway, and place the key across the gap like a bridge. Walk across the key bridge in the regular scale.
After the scene is finished, you'll next need to open the red door of the purple house — suspended in the air. Scale down the key by placing it outside the dome and then picking up the smaller version from inside the dome. Next, use that smaller key to unlock the red door while still inside the dome.
Then scale the key up by placing it down somewhere and picking it back up from outside the dome. Take it back into the dome and lay it down like a bridge so you can access the purple house.
The Gateways (Chapter 3)
In this chapter, you'll start off in a sandy castle area. Go around the back of the building and you'll find a spherical pink crystal. Pick it up. Carry it over to another pink crystal. Touch them together and you'll be able to move into the main area with the dome.
With the pink crystal, head over to the pink/red castle and go inside. You'll find a lever — pull it and release the blue crystal. Place the blue crystal outside the castle, then use the pink crystal to get back to the dome. From inside the dome, pick up the blue crystal.
Next, scale down the pink crystal. Inside the dome, place the pink crystal on the blue castle's ramped roof. Pick up the blue crystal and hold it near the pink crystal to let it fall into the blue castle. Then, head out to the regular scale blue castle (while holding the blue crystal).
Inside, pull the lever. You should be able to access a green crystal. Take the green and pink crystals back to the dome.
Have both these crystals be small. Inside the dome, place the pink crystal on the balcony of the green house, then bring the green crystal near to let it fall inside. Go to the regular scale green house with the green crystal. Pass it through a hole in the fence and proceed inside the house with the pink crystal.
Pick up the key and head to the back of the house. Pass the key through the clover-shaped window and pull the lever. Find the green crystal and head back towards the dome. Pick up the key outside the green house.
Bring the key to the beach castle door to unlock it. Next, pick up the red crystal and pass it through the round window to get it inside. Enter the beach castle with the green crystal. Pull the lever, cross the bridge, and find the gear. Walk down towards the dome and the world will change.
Get the pink crystal again. Go out onto the bridge and jump to the large rock, then over the wall. You're now in the larger scale world. Turn left and walk towards the giant pink crystal. Touch it with your pink crystal to activate it, then go back up the stairs towards the elevator. Take the elevator back up. Grab the gear, take it inside the dome, and place it on the beach castle's tower.
The Wedge (Chapter 4)
Head to the back yard of the purple house and pull the lever. Head towards the giant version of the purple house. You won't be able to jump up the steps. To the right of the steps is a rake — walk up the rake to get onto the railing, then drop down onto one of the steps. Use plant pots and stones to clamber up the stairs.
Inside the giant house, use the books to get inside the green house. In there you'll find a wedge object — grab it and return to the dome.
There's a wooded area with a breakage in the fence. In the dome, place the wedge so that it leads up to this point, then head out to the regular scale and walk up and over the fence.
There are a couple of houses in this area with levers inside. Pull both of these, then head back into the dome. Place the wedge next to the house that's fenced in. Now, head out to the large scale world. You'll be able to pass through the gaps in the fence surrounding this house. Go up the wedge and inside.
On the far wall is a pipe. Climb up this pipe and onto the chair. From the chair, pull the lever. Return to the dome.
Scale up the wedge. Place it outside the walls of the area where there's a house with a smoking chimney. Use the elevator to get down to the regular scale, and walk up the giant wedge and over the wall. Go to the small green house and pull the lever inside to lower the fence. Pull the lever in the medium house to lower the wall.
Return to the dome and scale down the wedge. Place it sideways against the two-storey house.
Head out to the large scale version of this house. Walk up the side of the wedge to reach a landing. Hop over to the ledge with a lantern on it. Walk along so that you can jump onto the railing of the wedge, and continue up to the second floor of the house. Inside, walk through the hole in the wall on the left and grab the key. Go back to the dome.
Use the key to unlock the door to the church. Next, go inside the dome and get the wedge. Scale it up and place it in front of the church, using it as a ramp to get up to the bell at the top. Walk up the ramp and interact with the bell.
The Escape (Chapter 5)

This chapter is far less puzzle-intensive. All you need to do is follow the main path to an elevator. Go down and pick up the orb on the left. Use it to find yellow marks on the ground. Follow these through a maze, with the occasional illusory wall.
Once you reach the end of this, you'll be moving onto chapter 6.
The Spiral (Chapter 6)
Follow the path and pull the lever. It'll make a bridge appear. Cross that bridge to another lever, pull it. This makes two paths appear, one with a gap in it. Cross the completed path to find a small scale version of the map. Pick up the fallen piece of the path and place it in the gap. Then, looking at this small version of the map, find the floating platform and pull the lever. Go back and cross the now-complete path. Pull another lever, and continue to the building.
Inside, head into the room on the right. There are three pillars you can pick up. Place them on the patterned slab in a 'Z' style pattern, in such a way that you'd be able to walk up all three. The pillars you place will appear on the far wall in the corridor, allowing you to clamber up once done correctly. It's a bit fiddly, but you'll get there through trial and error.
You'll next come across two rooms. In the further room is a locked door, and a key appears in both rooms. In the room with the two pits, pick the key up from the right pit and place it down so it's at an angle in the left pit, resting on the side. Then go out to the room where the large version of the key appears. Use it as a ramp to get up to a second level. There's another version of the key up here. Pick it up and use it to unlock the door.
Advance and you'll find two puzzle boards and two Tetris-style pieces you can pick up. Grab the left piece and place it in the left puzzle board, with the gate side touching the red block. Take the right piece and place it in the right puzzle board, with the gate side touching the right-most building (see images).
Now continue, walking over the red and blue pathways you've placed. Drop down to reach the exit.
The Exchange (Chapter 7)
You'll be in a new area with the dome surrounded by rocks. Pick up the dome, and move it over to the stairs of the dead tree. Walk up the stairs and pull the lever.
Next, pick the dome up and move it to the tower with the butterflies outside. Interact with the owl ornament in the building. When you pull the lever here, it will start a timer. You need to reach the opposite building before the door closes. This is impossible unless you use the dome. So, pull the lever, then exit and pick up the dome, move it over to the building you need to reach, put it down, and go inside. Interact with the crystal in there.
Go back out and a spire will appear. Go inside the dome and stand on the plate in front of the spire. Turn the sections of the spire so they match the symbols on the floating rocks. Another spire will appear. You need to arrange the dome in such a way that, when you stand on the plate, you can see the symbols on the floating rocks. Move the dome to the other side of the spire with the large hole facing you so you can see the new set of symbols.
A new building will open. Head over there and interact with the bell. This will make some rocks appear — place the dome onto the largest rock so that the world is at an angle. This will allow you to walk up the ramp in the nearby building and reach the sketchbook.
Once that's done, head back to the stairs leading to the tree and walk up to it. Roll credits!
We hope you've found this Maquette walkthrough and guide useful. Have you been playing this first person puzzler? Discuss in the comments section below.


Comments 4
Was this game built in Dreams?
I've just opened up the game. Am I right in that in plays in 30fps? I really hate moving the camera and it feels off especially as its first person. Surprising they couldn't push it to run at 60fps on PS5. Will likely give this one a miss then.
hold circle to skip 👍
Performance is dodgy and frames seem to dip especially at the start but later feels alot better.
loved the game can't imagine how hard this was to make with such a small team.
@KPraj It runs at 60 but it does vary. Plus, some people have reported a brief hitch when the text appears on walls. There's also a puzzle towards the end that I've read can tank the framerate. Not sure why it'd run badly for you in general, though. The specs it needs on PC are incredibly low - like, a GPU from 8 years ago. That said, you can actually change the texture quality even in the PS5 version so try that out.
Show Comments
Leave A Comment
Hold on there, you need to login to post a comment...