Looking for the best controller settings and camera in FIFA 23? Before you can even think about the Best Formations and Custom Tactics for FUT, you're probably going to want to calibrate your game correctly. This means, opting for the best controller settings and camera settings. A lot of this will come down to personal choice, so as part of our FIFA 23 guide, we're going to share some insight and suggestions. Remember, if something's not working for you personally, then you can always change it at a later date.
FIFA 23: Best Controller Settings and Camera
On this page, we're going to list the best controller settings and camera in FIFA 23. Please do keep in mind that a lot of this will come down to personal preference, so be sure to experiment and find what works best for you.
Best Controller Settings
The best controller settings in FIFA 23 will largely come down to personal preference, but you can edit them at any time by navigating to Customise > Settings. We'd recommend you set your game up as described below, but feel free to deviate from our suggestions according to your own personal playstyle and taste. The settings exist to give you options, so be sure to experiment and find what you're comfortable with.
One thing worth noting is that in FIFA 23, EA Sports has added a Recommended and Not Recommended tab to all of the settings. We've outlined our personal optimal settings below, some of which differ to what the publisher recommends. Ultimately, as alluded to above, it's all about experimentation and finding what works best for you.
- Competitive Master Switch: On
The Competitive Master Switch basically assigns the default competitive settings to the entire game, including Manual Jockey. We'd recommend turning this On as these are the default settings online, and you may as well familiarise yourself with them when playing offline. - Through Pass Assistance: Semi
You'll no doubt have encountered situations in previous FIFA games where you play a Through Pass and it goes to the wrong player. By toggling Semi to Manual, you do have more control over where you thread the ball, but we'd recommend you keep it on Semi for now just because you get a little more assistance from the game that way while still being able to aim. - Timed Finishing: On
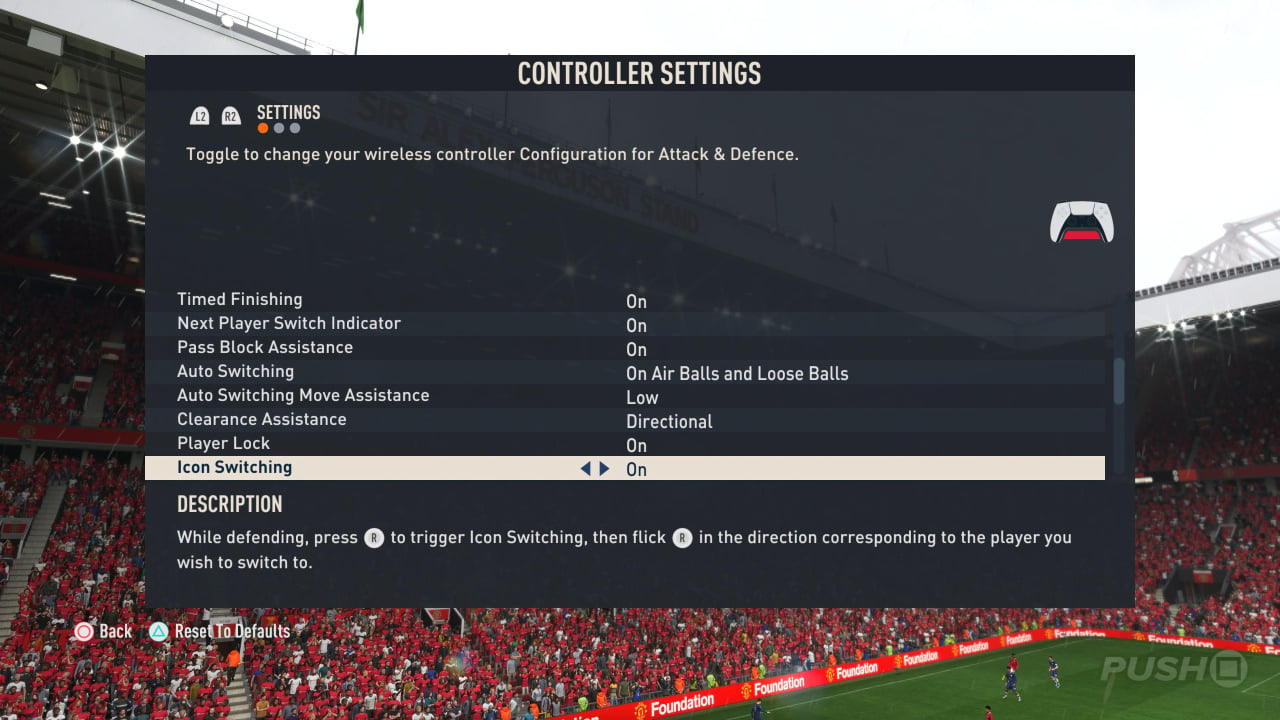
Timed Finishing is still pretty good in FIFA 23 in our opinion. Unless you're the kind of person who spams the shoot button inside the box, keep this turned on and try to get to grips with how it works. - Next Player Switch Indicator: On
The Next Player Switch Indicator shows which player the L1 button will toggle to, and is a pretty useful feature to have enabled. - Pass Block Assistance: On
It's best to keep Pass Block Assistance enabled, as when this is set to On, both your user controlled and CPU players will stretch out to intercept passes and shots when possible. - Auto Switching: On Air Balls and Loose Balls
Auto Switching defaults to Automatic, but the problem with this is that sometimes it'll switch to players you don't want to use. It's best to use On Air Balls and Loose Balls, as this will automatically put you in control when you have to contend with things like crosses or lofted through balls. - Auto Switching Move Assistance: Low
In essence, Auto Switching Move Assistance will keep your player moving in a specific direction for a short period of time after the switch has occurred. This can be helpful if you're already holding the analogue stick in a given direction when the switch takes place. For most players, Low is the best setting, as High takes away too much control and None is more of a pro-player option. - Clearance Assistance: Directional
Classic Clearance Assistance means the ball will be hoofed in a direction determined by the game, whereas Directional will give you much more control over where you want to put it. This can be a good way of starting counter-attacks. - Player Lock: On
Even if you're not a fan of the Player Lock mechanic, it's best to keep this On in case you ever want to use it. Because of the way it's implemented, it won't affect your gameplay if you don't. - Icon Switching: On
A new mechanic which allows you to push in the R3 button in order to choose between four different players. Similarly to the Player Lock, it's best to leave Icon Switching set to On as it doesn't get in the way even if you don't use it. - Right Stick Switching: Adaptive
- Right Stick Switching Reference: Player Relative
If you imagine your user controlled player is at the centre of a circle, pushing the right stick relative to their position will allow you to switch between different teammates when set to Player Relative. You can opt for Ball Relative as an alternative, but this is disorientating as the ball is likely to get moved about a lot. We'd also recommend you use the new Adaptive Right Stick Switching setting, as this allows you to hold down the stick for longer in order to switch to players further away. - Ground Pass Assistance: Assisted
Unless you're an elite tier player, we'd recommend keeping most gameplay assistances to Assisted as opposed to Semi or Manual, unless specified. - Shot Assistance: Assisted
- Cross Assistance: Semi
Setting Cross Assistance to Semi will allow you to control the power of your crosses, meaning you can either cross to the back post or near post depending on what you want to do. With Assisted enabled it'll automatically select a player to target. - Lob Pass Assistance: Assisted
- Lobbed Through Pass: Semi
Like the Through Pass Assistance outlined earlier, we'd recommend you keep Lobbed Through Pass on Semi because you'll benefit from that extra layer of assistance when you're pinging the ball downfield to start counter attacks. - Save Assistance: Assisted
- Analog Sprint: On
Allows you to control the speed of your players depending on how much pressure you apply to the R2 trigger. If you use R2 as your Sprint button then we'd recommend you set this to On, but it won't do anything if you use R1 to Sprint. - Pass Receiver Lock: Late
By setting the Pass Receiver Lock to Late you'll have a split second to change your mind about the direction of your pass, while Early will mean you're locked in a specific direction when you push the button.
Best Camera
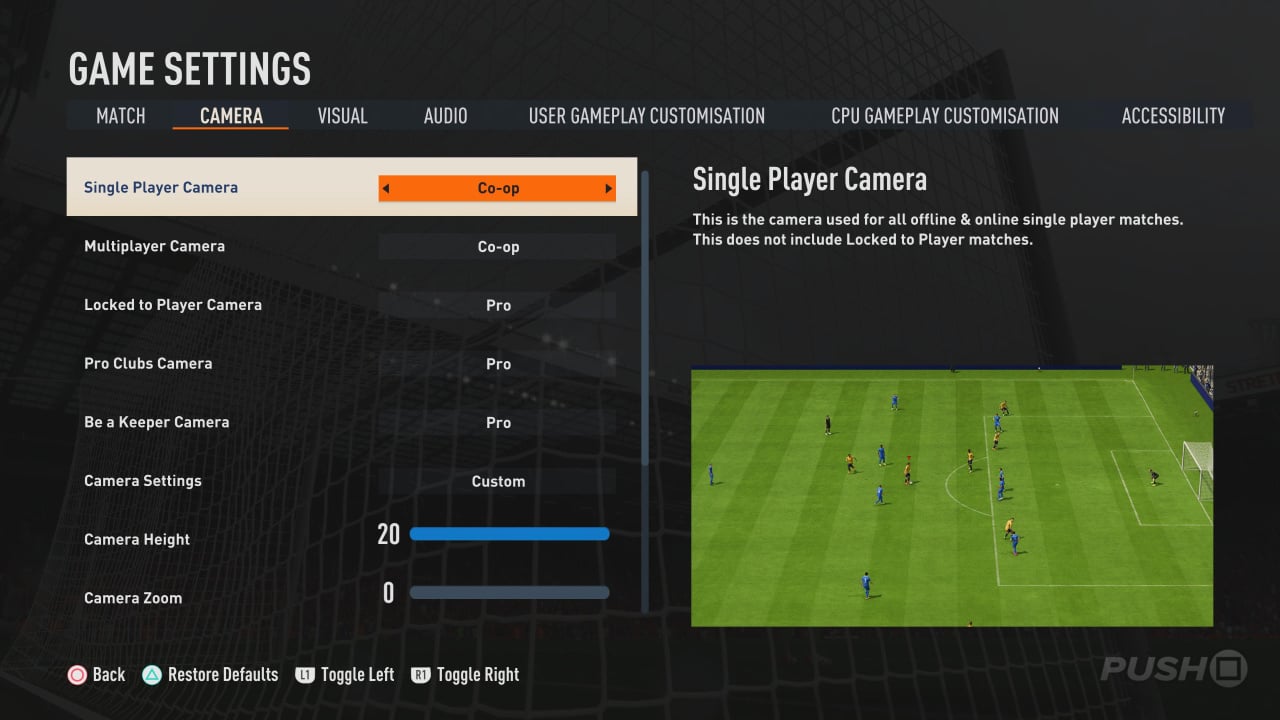
Much like the best controller settings in FIFA 23, the best camera settings will also come down to personal preference. If you're planning to play competitively, then we'd recommend opting for the Co-Op option as this will give you the best view of the pitch. You should also increase the Height to 20 and Zoom to 0 in order to see as much of the field as possible, although this will come at the cost of potentially not being able to see individual animations as well, which may cause you to mistime mechanics like Timed Shots. You'll need to find a happy medium that works for you, which will likely depend on the size of your television and how close you sit to it.
If you're not planning to play online, and want a more immersive experience, then we'd recommend selecting the EA Sports GameCam option and then setting the Zoom to 0 in order to see as much as possible. This will provide you with a more immersive experience while still giving you a decent overall view of the field. Personally, we'll sometimes toggle between the Co-Op camera when playing FUT 23 and the EA Sports GameCam when playing Career Mode, but it's up to you.
As previously mentioned, much of this will come down to personal preference, so feel free to tinker until you find the settings that work for you. There's no right or wrong answer here.
What do you think are the best controller settings and camera settings in FIFA 23? Take a look at our FIFA 23 guide for much more information, and let us know in the comments section below.


Comments 0
Wow, no comments yet... why not be the first?
Leave A Comment
Hold on there, you need to login to post a comment...