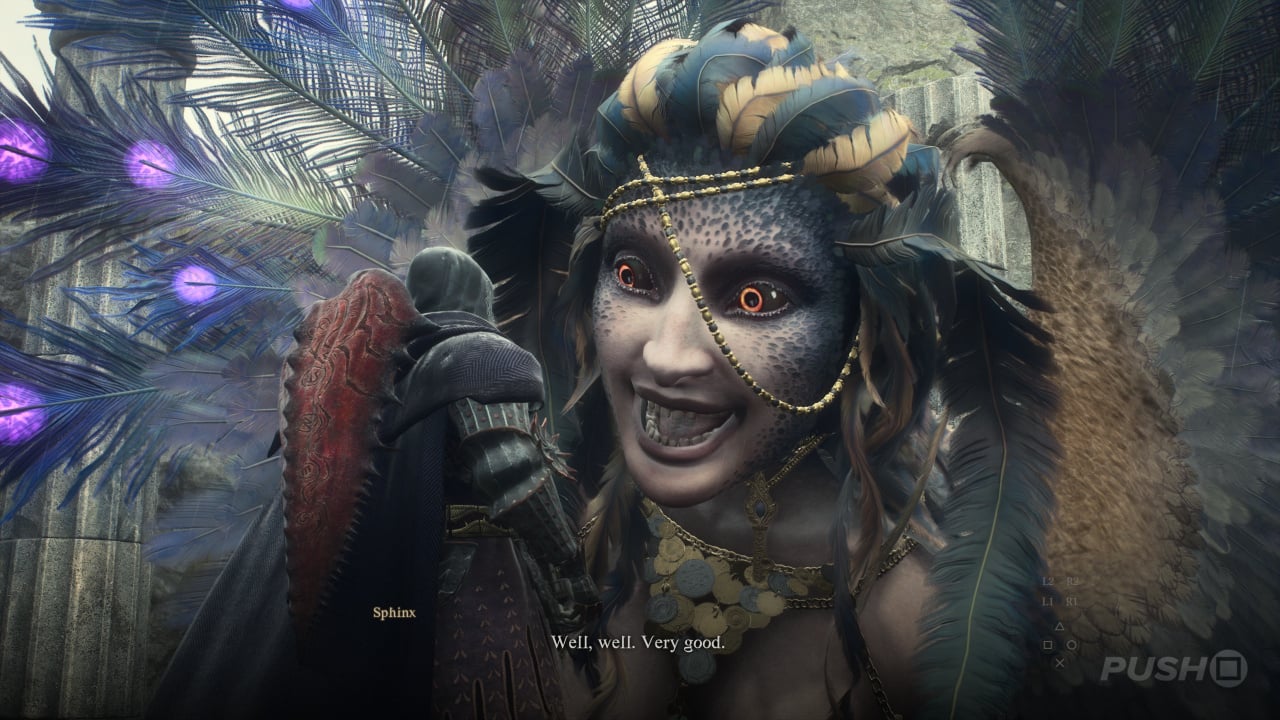
How do you answer the Sphinx's riddles in Dragon's Dogma 2? A side quest called A Game of Wits will see you face off against a legendary creature known as the Sphinx in, well, a game of wits. She'll task you with answering a number of riddles, most of which require thinking outside of the box. Answering these riddles correctly will net you a bunch of rare items as rewards.
In this Dragon's Dogma 2 guide, we're going to detail all of the Sphinx's riddles, where you need to go and what you need to do in order to actually answer them, and the rewards that you get for completing them.
Subscribe to Push Square on YouTube169k
Dragon's Dogma 2: All Sphinx Riddle Answers, Locations, and Rewards
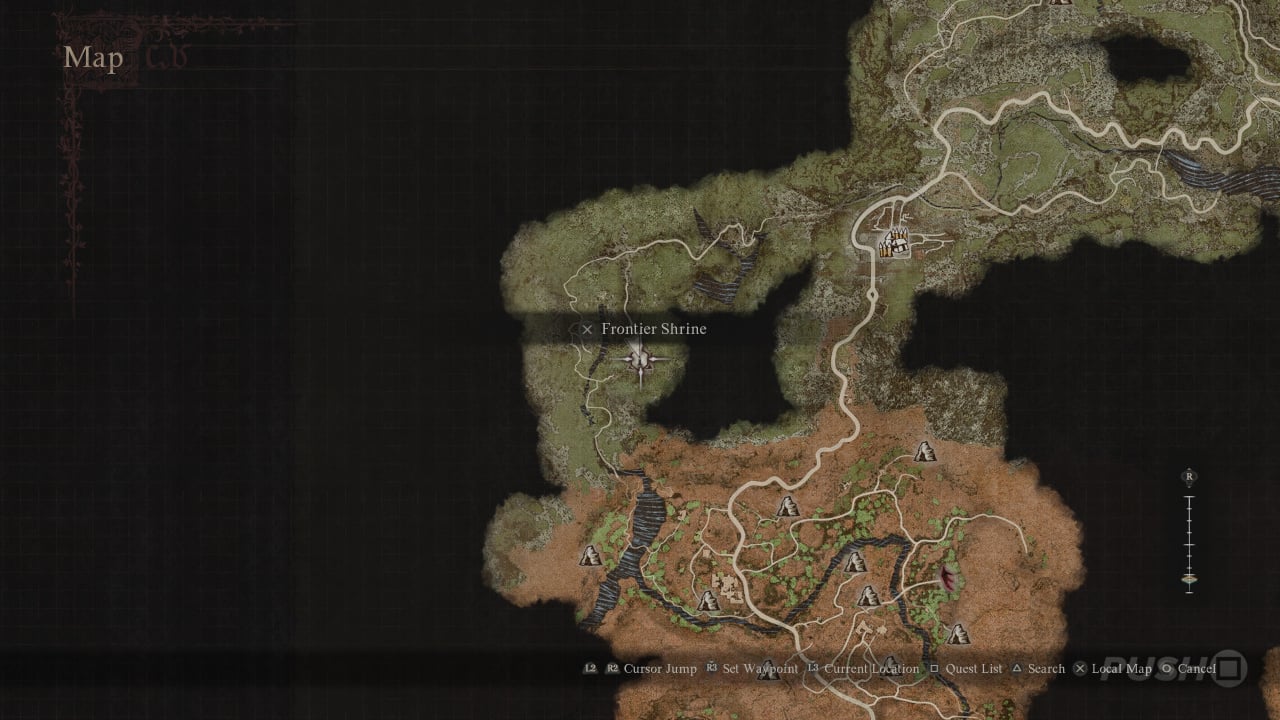
Before we begin, you'll need to find the Sphinx herself. Fortunately, she can always be found in a single location — the Mountain Shrine, in Vermund.

How to Find the Sphinx
Actually getting to the Mountain Shrine isn't easy, however. There are two ways you can reach it: either by traversing the Misty Marshes from the east, or by going through the Ancient Battleground to the south.
The Misty Marshes route is probably the most straightforward, but the marshes themselves are shrouded on your map. Once you're inside of them, just keep heading west — there's a path with torches that takes you this way — and you'll eventually reach the ruins of a small village. At the back of the village is a series of rocky cliffs that you can climb. Get up there, and you'll be out of the swamps and on the mountain path towards the Mountain Shrine.
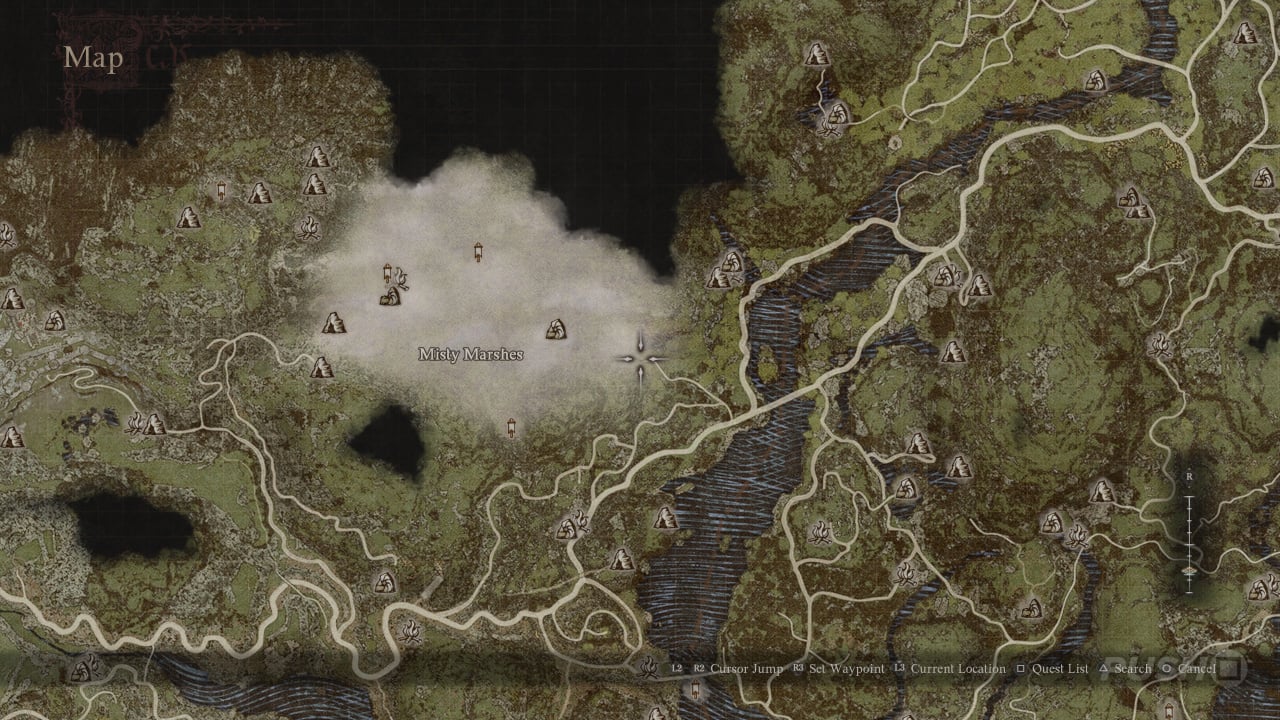
Note that when taking this route, you'll need to contend with creatures that only appear at night, like ghosts, skeletons, and zombies. This is because daylight can't penetrate the Misty Marshes. On the path to the shrine, you'll need to be aware of harpies and some rock-skinned saurians. There is a campsite just outside of the Sphinx's Mountain Shrine.
The Ancient Battleground route is a little trickier to navigate. You'll need to take the roads north of the Border Rest Checkpoint town, and just keep going as north as you can.
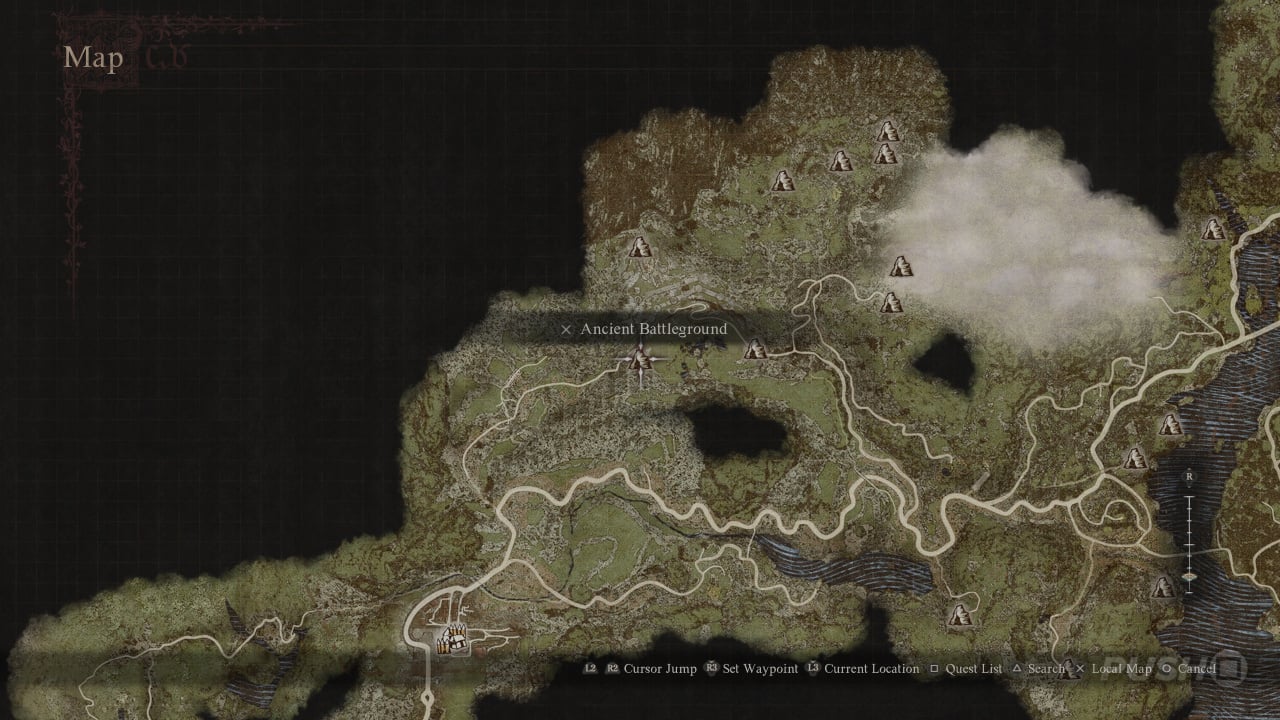
If you haven't discovered him already, you'll come across a man named Oskar, who'll ask you to escort him through the Ancient Battleground as part of a quest called Tolled to Rest. By helping him out, he'll show you the way.
If you're not with Oskar, you'll need to navigate the castle ruins yourself. Once you're on top of the old battlements, look for a ladder that leads up onto the top of the ruins. Behind the ruins, leading into the mountain itself, is a cave called Worldsend Cavern. Proceed through the cavern and you should emerge on the paths that head towards the Mountain Shrine. By wary, though: Worldsend Cavern houses a powerful golem enemy.
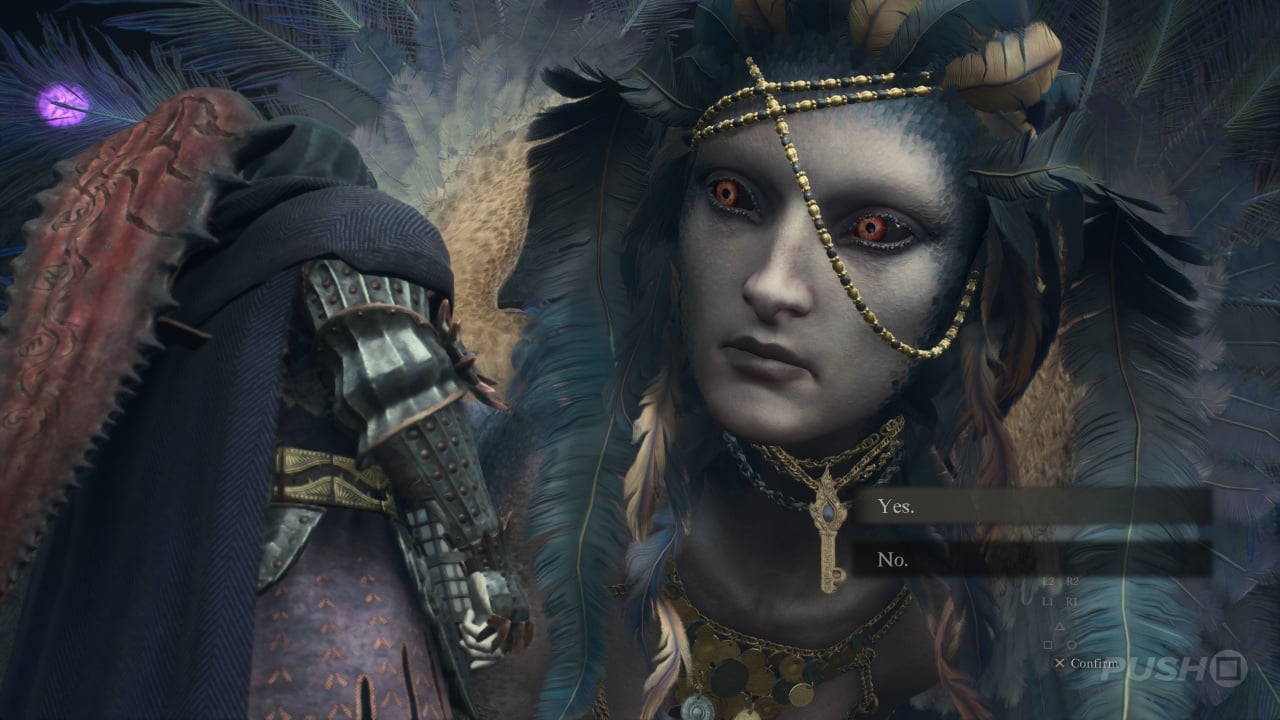
Once you're found the Mountain Shrine, speak with the Sphinx and she'll present five riddles. Pick the riddle(s) that you want to hear, and then it's up to you to solve them.
IMPORTANT: At this point, you should consider placing a Portcrystal near the Mountain Shrine, which lets you fast travel to it using a Ferrystone. Portcrystals are very rare items that can be found throughout the game — usually through key quests — and they can be placed anywhere on the map (they can also be picked up again and placed somewhere else).
What If You Fail a Riddle?
If you fail a riddle, you simply forfeit that riddle's reward, and you won't be able to try that riddle again. In other words, you only get one chance with each riddle. The overall quest will continue, but you won't be able to get the associated Trophy, which is only unlocked if you answer all of the riddles (barring the final riddle) correctly.
If, at any point, you think you've got an answer wrong and you're eager to collect every reward, either quickly close the game and reload your save before the game has a chance to autosave, or quit the game and choose to load from your last rest at an inn. The latter method is more reliable, but you may lose some progress depending on how far back your last rest was.
Can You Fight the Sphinx?
Yes, you can begin combat with the Sphinx by attacking her — but it accomplishes nothing. You won't be able to defeat her, and she'll simply fly away. You'll fail the quest as a result, and her treasure chests will remain locked with no other way to open them.

Riddle of Eyes
Let's start at the top, with the Riddle of Eyes. The Sphinx will ask you to retrieve the "item of greatest value" from the nearby cave, located just at the bottom of the stairs that lead up to the shrine. Head inside and you'll find skeletons, hobgoblins, and an ogre, along with a few treasure chests. These chests contain rotten food, which may have you wondering whether this riddle is some kind of trick.
However, the treasure chest that you want is actually right at the entrance of the cave, and you'll probably only notice it on your way back out. It sits just above the entrance, and you'll need to climb up a couple of platforms to reach it. It contains an item called the Sealing Phial.
Bring the Sealing Phial back to the Sphinx and you'll have solved the first riddle.
IMPORTANT: You get to keep the Sealing Phial. This item can be used to trap an NPC — not a pawn — inside, allowing you to carry them wherever you go. Using the Sealing Phial again will release that NPC, but the item will be broken in the process. The Sealing Phial can be useful for later riddles.
Reward: Wakestone
Riddle of Madness
For the Riddle of Madness, the Sphinx will task you with bringing your "most beloved" to the shrine. She's referring to a character who has a high affinity with you. This could be someone you've completed a side quest for, so think about who you've helped out on your travels. You do not have to be romantically involved with the character that you choose.
If you're having any doubts at all about who your "beloved" is, then we'd suggest waiting until later in the game to answer this riddle. Once you've established a powerful bond with a character, you'll notice that when you talk to them, their cheeks will glow red. This means that your affinity with that character is maxed.
This is how it looks:
Or, you can take the much, much easier route of offering your main pawn up as your beloved — assuming that you're okay with it. And yes, this really does work.
When you've made your choice, bring that character to the Sphinx. If it's not your main pawn, the easiest way to do this is to pick the character up, and then use a Ferrystone to warp directly to the Mountain Shrine via the Portcrystal that we previously suggested placing there.
Another way to do this is to wait until you're given an escort quest by a character who likes you. These quests usually begin outside of your home, where the character will be waiting for you. Accept the escort mission and that character will follow you wherever you go, only leaving when you reach their desired destination. This means that you can bring that character all the way to the Mountain Shrine — although you'll have to make sure that they aren't killed on the way there!
And finally, you can use the Sealing Phial from the Riddle of Eyes to suck your chosen character into the bottle, and take them to the Sphinx. But be warned that the Sealing Phial will break upon releasing the character.

Carry your "beloved" to the platform in front of the Sphinx and put them down. Tell the Sphinx that they're your answer, and you'll complete the riddle.
Reward: Portcrystal
Riddle of Wisdom
The Riddle of Wisdom is perhaps the Sphinx's cheekiest riddle. She'll ask you to find her "parent" — and depending on your experience with the game thus far, you may have no idea what that means.
Here's the trick: pawns can be created with Sphinx-related monikers — and you may have seen some during your travels. There's SphinxFather and SphinxMother, and you need to bring a pawn with one of those monikers to the Sphinx.
The easiest way to find a pawn with a Sphinx moniker is to visit the Riftstone of Fellowship, which is located near the main entrance to Harve Village. This Riftstone is populated exclusively by pawns with Sphinx monikers.
Hire one of these Sphinx-related pawns and bring them to the Mountain Shrine. Pick them up and place them on the platform, then give the Sphinx your answer.
Reward: 1,200 Rift Crystals
Riddle of Conviction
The Riddle of Conviction is the easiest riddle of the bunch — although it might not seem that way at a glance. The Sphinx will ask for your "most prized possession" — but this is actually a trick. You can give the Sphinx whatever item you want — the real riddle hides in the title itself: 'Conviction'. She'll warn you that you may never get the item back, and that's the real the test here.
Hand over an item and agree to her terms. She'll congratulate you, and the riddle will be answered.
Reward: The treasure chest will contain whatever item you gave to the Sphinx. Gotcha!
Riddle of Rumination
This riddle is going to be a major sticking point for many — and there's no way around it (as far as we know). The Sphinx will task you with returning to the place where you found your very first Seeker's Token. And you only have seven in-game days to find it.
This is a bit of a nightmare. You may have an idea of where you found your first Seeker's Token — it was probably somewhere up north, where you begin the game, or within the city of Vernworth.
The sad truth is that we can't really help you with this one; if you have no idea where to go, your best bet is trying to retrace your steps from the beginning of the game.
If you're lucky enough to remember where that first Seeker's Token was found, then in its place will be a new item called the Finder's Token. Bring this token back to the Sphinx to complete the riddle.
If you can't complete this riddle, and the seven day time limit passes, you'll still be able to continue with the overall Sphinx quest. However, you won't be able to unlock the associated treasure chest, and you won't get the Trophy for completing all riddles.
Reward: Ferrystone x3
How to Find the Sphinx (Again)
Upon answering her five riddles, the Sphinx will leave the Mountain Shrine and fly south. She'll now take up residence at a location called the Frontier Shrine, which can be found just to the southwest of the Border Rest Checkpoint.
IMPORTANT: If you placed a Portcrystal at the Mountain Shrine so that you could fast travel to the Sphinx, remember to pick the Portcrystal up and take it with you. You can then place it at the Frontier Shrine instead, as there's no real reason to go back to the Sphinx's first lair.
For what it's worth, there is another way to get to the Frontier Shrine. Before the Sphinx takes off from the Mountain Shrine, you can leap up and grab onto her, and she'll fly you all the way to the new shrine. It sounds crazy, and it is, but it's something to keep in mind if you're up for some fun. If you do manage to fly all the way there, be sure to stand on her back so your stamina doesn't drain. If your stamina runs out, you'll most likely fall to your death.
Maybe something to try on New Game+?
Getting to the Frontier Shrine on foot is a case of traversing some dangerous mountain paths. To get there from the Border Rest Checkpoint itself, you'll need to head under the town's bridge, following the river south. You'll need to go through a cave full of rock-skinned saurians, cross a rather fragile bridge, and then continue winding upwards. You may also need need to slay larger foes, like a cyclops, minotaur, or even a chimera as you arrive in an area with heavy rain.
Eventually, you'll come to a path that branches off to the west — it can be quite hard to see, especially at night, but you should recognise it by the sight of a fallen pillar. Follow this path and you'll come to the Frontier Shrine, where the Sphinx awaits once again.
Riddle of Reunion
This second set of riddles starts with an easy one. The Riddle of Reunion is completed automatically once you speak to the Sphinx at the Frontier Shrine. One of the chests behind her will unlock, and you can claim your first prize.
Reward: 100,000 gold
Preparing for the New Riddles (Please Read This)
IMPORTANT: From this point on, the Sphinx will give you four new riddles — and the order of these riddles is randomised. As such, you'll need to scroll down this page to find information on the current riddle.
SUPER IMPORTANT: We don't want to spoil anything specific, but if you want to unlock the Sphinx's final chest in the easiest way possible, your vocation must be one that can equip a bow.
That means you either need to be an Archer, or a Warfarer, with a physical bow equipped, when you complete the last of the four riddles. You will not be able to switch vocations before the final test begins.
If you need help with vocations and how to unlock them, be sure to check out this guide: